Face Image Retrieval With Attribute Based Search
| ✅ Paper Type: Free Essay | ✅ Subject: Computer Science |
| ✅ Wordcount: 2609 words | ✅ Published: 22 Jun 2018 |
Implementation is the process of converting a new system design into operation. Implementation is the stage of turning the theoretical design into a working system. Therefore it is considered as most important stage in achieving a successful new system and in giving the user, confidence that the new system will work and be effective. It also entails careful planning, investigation of the existing system and it’s constraints on implementation, designing of methods to accomplish changeover and estimate changeover methods.
Modules
The project entitled as “Efficient Face Image Retrieval from Large Scale Database Using Attribute Based Search and Ranking” developed using Java and the Modules display as follows:
- Content based image retrieval
- Attribute based search
- Face Image Retrieval
Modules Description
Content-based image search
Content-based image retrieval (CBIR), also called asquery by image content (QBIC) andcontent-based visual information retrieval (CBVIR) is the application of computer vision techniques to the image retrieval problem, that is, the problem of searching digital images in large databases. Present state-of-the-art solutions describe images using high-level semantic concepts which are promising for CBIR. CBIR system consists of several stages as follows:
- Image Acquisition: This stage acquires digital images from database.
- Image preprocessing: The image is first processed in order to take out the features, which portray its contents. This processing entails filtering, normalization, segmentation, and object identification. Like, image segmentation is the process of dividing an image into multiple parts. The output is set of important regions and objects.
- Feature Extraction: Shape, texture, color, etc are the features used to characterize the content of the image. Further these features are classified as low-level and high-level features. Here visual information is extracted from the image and collect them as feature vectors in a feature database. For every pixel, the image description is instigated in the form of feature value by means of feature extraction, later these feature values are used to evaluate the query with the other images during retrieval.
- Similarity Matching: Information of every image is stored in its feature vectors for computation process and these feature vectors are coordinated with the feature vectors of query image i.e. the searched image in the image database is present or not or how many are similar kind of images are exist or not, which helps in determining the similarity. This step involves the matching of features (e.g. shape, color) to yield a result that is similar to the query image.
- Resultant Retrieved images: This step investigates the earlier maintained information to find the matched images from database. It displays similar images having closest features as that of the query image.
- User interface and feedback: This step operates the display of results, ranking, and the type of user interaction with prospect of refining the search using some automatic or manual preferences scheme.
Attribute based search
However, the evolution of CBIR is overloaded by the semantic gap between the extracted low-level visual features and the required high-level semantics. Even if the images are annotated well through precise concepts, another disreputable gap still leads to unsatisfactory results. This gap is called the intention gap between the envisioned objectives of the users and the indefinite semantics delivered by the query, due to the lack of ability of the query to express the user’s objectives accurately. To bridge this gap, an approach called attribute based image retrieval is used. Here, attributes transfer properties that distinguish objects such as the visual appearances (e.g. shape, texture), functionalities and various other discriminative properties. On one hand, attributes acts as transitional semantics that clearly unites the low-level features and high-level concepts, leads to decline of semantic gap because attributes usually demonstrate general visual properties, which can be simply extracted and modeled contrast to high-level concepts that have higher visual inconsistencies. On the other hand, attributes improve active concept-based image semantic representation and offer more inclusive semantic descriptions of images. By using these attributes, users can allocate most important and accurate semantic description of images which leads to satisfactory results. Attribute detection has sufficient quality on different human attributes. Using these human attributes different applications like face verification, face identification, keyword-based face image retrieval, and similar attribute search have achieved promising results.
Goal and approach of attribute based retrieval
Previous techniques utilize descriptors on the image that capture global features like color, texture, frequency, etc. Images that have global descriptors return most similar images to query image but not correct matched images. The limitations of these methods are based on matching low-level features is that for many query images; they cannot perform retrieval in a satisfied way and methods based on local descriptors work only on objects. On other hand, methods that utilize global descriptors are not strong to most geometric transformations. In image classification and object recognition “attributes” are used to represent the images. An attribute has a name and a semantic meaning, but it is easy to recognize for a machine. Attribute names are like name, gender, race, etc. Attribute can be learnt automatically by image classification methods. The objective of this work is to use an attribute-based representation to restore or balance an image search engine. User will calculate various methods to compare attributes, including metric learning. Comparisons will be carried out on standard datasets. Then attribute-based retrieval will be combined with existing retrieval methods.
Face Image Retrieval
Current face image retrieval methods reach impressive results, but deficient to refine the search, mainly for geometric face attributes. Users cannot find faces easily with slightly more specific leftward pose shifts. To address this problem, a new face search technique is proposed that is complementary to current search engines. The proposed facial image retrieval model deals with a problem of searching similar facial images and retrieving in the search space of the facial images by assimilating (CBIR) techniques and face recognition techniques, by means of semantic description of the facial image. This aims to lessen the semantic gap between high level query requirement and low level facial features of the human face image, such that the system can be ready to meet human needs in description and retrieval of facial image.
An efficient content based face image retrieval system is proposed to retrieve the face images. Attributes from face are used to further improving the retrieval performance. Finally inverted index is used in retrieval stage. It has applications in automatic face annotation, crime investigation etc. For large scale datasets, it is essential for an image search application to rank the images such that the most relevant images are sited at the top. This work analysed top results related to a query image with existing method. Experimental results shows that proposed method have better top results compared to existing methods.
Experimental Setup
Installation of JDK 1.6 and Tomcat Server
JDK 1.6:
Step 1: Double click on the JDK 1.6 setup file then we will get the following window. A window with License Agreement will be displayed. Then press “Accept” button.
Step 2: Now a custom setup window will be appeared. Then Click“Next”to continue.
Step 3: AProgresspanel will be appeared that takes a few minutes to go through the installation.
Step 4: A custom setup window for Runtime Environment will be appeared. Then Click“Next” to continue.
Step 5: A Progresspanel will be appeared that takes a few minutes to go through the installation.
Step 6: When the installation is completed, click“Finish”to exit the wizard.
Step 7: To set the environment variables for java, Right-Click mycomputer and click properties. Then, the below window will be appeared and Click Environment variables.
Step 8: Now, click new in the System variables section.
Step 9: After clicking new button, a box will appear containing with variable name and variable value. Give the variable name as “PATH” and variable value as the java bin file path.
Step 10: Finally click OK. Now, we can successfully run java programs.
Tomcat server:
Tomcat is an open source web server developed by Apache Group. Apache Tomcat is the servlet container used in official Reference Implementation for the Java Servlet and JavaServer Pages technologies. The Java Servlet and JavaServer Pages specifications are developed by Sun under the Java Community Process. Web Servers support only web components while an application server supports web components as well as business components. To develop a web applications with jsp/servlet install Tomcat. A web server is, of course, the program that dishes out web pages in response to requests from a user sitting at a web browser and returns vibrant results to the user’s browser. This is an aspect of the web that Apache’s Tomcat is very good at because Tomcat provides both Java servlet and Java Server Pages (JSP) technologies. Ultimately Tomcat is a good option for many applications as a web server.
Step 1: First double click on the Apache Tomcat setup file and then click Next button.
Step 2: Now a window with License Agreement will be displayed as above. Then press I Agree option.
Step 3: Now select type of the install as Full and then click on Next.
Step 4: Now select the destination where the Tomcat has to be installed and click on Next.
Step 5: Now set the configuration, connector port as 8081 and set the username and password as admin and click on Next.
Step 6: Now a window with Java Virtual Machine will be displayed and click Install option.
Step 7: Now the window with installation process will be displayed and might take few minutes.
Step 8: Select the Run Apache Tomcat option and click on Finish.
Setting the Java Environment Variable:
Here are the steps for setting the environment variable on mycomputer. These steps are similar for all windows. Open the control panel under the start menu.
1. Double-click on System.
2. Click on the Advanced tab.
3. Click on the Environment Variables button.
4. Under System Variables, click on the New button.
5. For variable name, type:JAVA_HOME
6. For variable value, type:C:j2sdk1.4.2_01
7. Continue to click OK to exit the dialog windows.
Now set the following in Variable and value:
1. Variable name: CLASSPATH;
Variable value: C:Program FilesApache Software FoundationTomcat 6.0bin; C:Program FilesApache Software FoundationTomcat 6.0libservlet-api.jar; C:Program FilesApache Software FoundationTomcat 6.0libjsp-api.jar;
2. Variable name: PATH;
Variable value: C:Program FilesJavajdk1.6.0_21bin; and then click on OK.
- Now for checking whether the Tomcat has installed successfully or not, open the browser and type http:/localhost:8081/. If it is installed successfully the following page will be displayed.

- After clicking the Tomcat Manager then will ask to enter username and password.
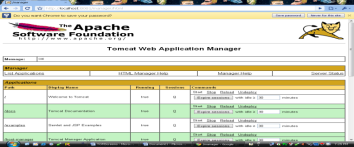
- After clicking the login option the Tomcat Web Application Manager page will be displayed.
Installation of MySQL and SQLyog
MySQL is definitely the most admired and widely-used open source database, simple to set up and use and is recognized as one of the fastest database engines.
Manual installation offers several benefits:
- Backing up, reinstalling, or moving databases can be achieved in seconds.
- MySQL can be installed anywhere, such as a portable USB drive.
MYSQL installation steps:
Step 1: Download MySQL fromdev.mysql.com/downloads/. FollowMySQL Community Server,Windowsand download the “Without installer” version.
Step 2: Extract the files – install MySQL to C:mysql, so extract the ZIP to C: drive and rename the folder from “mysql-x.x.xx-win32″ to “mysql”. MySQL can be installed anywhere on your system. If lightweight installation is needed then remove all sub-folders except for bin, data, scripts and share.
Step 3: Move the data folder (optional) – placing the data folder on another drive or partition is recommended to make backups and re-installation easier. For example, create a folder called D:MySQLdata and move the contents of C:mysqldata into it. Now two folders are there, D:MySQLdatamysql and D:MySQLdatatest. The original C:mysqldata folder can be removed.
Step 4: Create a configuration file – MySQL provides several configuration methods but, in general, it is easiest to to create a my.ini file in the mysql folder. There are several options to squeeze MySQL to exact requirements, but the simplest my.ini file is: [mysqld]
# installation directory
basedir=”C:/mysql/”
# data directory
datadir=”D:/MySQLdata/”
Step 5: Test installation – MySQL server is started by running the command C:mysqlbinmysqld.exe. Open a command box (Start > Run > cmd) and enter the following commands:
Cd mysqlbin
Mysqld
This will start the MySQL server which listens for requests on localhost port 3306. Now start the MySQL command line tool and connect to the database. Open another command box and enter:
cd mysqlbin
mysql -u root
This will show a welcome message and the mysql> prompt. Enter “show databases;” to view a list of the pre-defined databases.
Step 6: Change root password – MySQL root user is an all-powerful account that can create and destroy databases. In shared network, it is advisable to change the default (blank) password. From the mysql> prompt, enter:
UPDATE mysql.user SET password=PASSWORD(“my-new-password”) WHERE User=’root’;
FLUSH PRIVILEGES;
Prompted the password for next time you start the MySQL command line. Enter “exit” at the mysql> prompt to stop the command line client, now shut down MySQL with the following command: mysqladmin.exe -u root shutdown.
Step 7: Install MySQL as a Windows service – The easiest way to start MySQL is to add it as a Windows service. From a command prompt, enter:
cd mysqlbin
mysqld –install
Open the Control Panel, Administrative Tools, then Services and double-click MySQL. Set the Startup type to “Automatic” to ensure MySQL starts every time pc is booted. Alternatively, set the Startup type to “Manual” and launch MySQL using the command “net start mysql”.
Note that the Windows service can be removed using:
cd mysqlbin
mysqld –remove
SQLYog Installation:
SQLYog is a freeware and download it at:http://www.webyog.com/en/.Click on “Download” in the SQLYog Community Edition (freeware). First click on SQLYog Community Edition 5.2(stable). A window is opened, asking what you want do.Choose “Record”. A new window will open and asking where you want to record this files.Make one click on “My documents” on the left, next click on “Record”. When download is finished choose “Execute” for launching the installation. If this window is not there then go to “My Documents” and make 2 clicks on the file that you have just downloaded. Then click on “Execute”.

Installation of sqlyog:
Step 1: After click on “Execute”, just click on “NEXT” button.

Step 2: In this page about the licence, choose “I accept” button and click on “NEXT”.
Step 3: Then asks where to record the program on computer. Choose a destination directory, and click on “Install” shown in below window.

Step 4: Then click on “NEXT”.
Step 5: Click on “Finish” for finishing the installation in the following window.

Set SQLYog
Step 1: When SQLYog is opened for first time set the program to which database you want to connect. For that, make 1 click on “New” button.

Step 2: Enter a name for the connection. It is just about a means of differentiating a connection for a base to another, it is neither the identifier of connexion, nor the password.
Step 3: Next, click on “OK”. SQLYog will open a connexion window to the database.
Enter the following settings:
- MySQL Host Address: It is about the address on the network of server, either return an address IP or an address URL. If the server is on the same computer that SQLYog, put “localhost”.
- Username: It’s the username, corresponding to “id” of the user. For example: “root”
- Password: It’s the password associate to Username
- Port: it’s the port number using by MySQL. Default: 3306.
- Database: It’s the name of the database witch you want to connect to. If don’t put anything here, SQLYog will show the entire database on the server.
After finished entering the information, test them by clicking on “Test Connexion” then click on the “Save” button for saving.
Cite This Work
To export a reference to this article please select a referencing stye below:
Related Services
View all


DMCA / Removal Request
If you are the original writer of this essay and no longer wish to have your work published on UKEssays.com then please click the following link to email our support team:
Request essay removal