Cryptography: PKI applied to Secure Shell Protocol
| ✅ Paper Type: Free Essay | ✅ Subject: Computer Science |
| ✅ Wordcount: 4092 words | ✅ Published: 23 Sep 2019 |


1 Table of Contents
5.4 Digital signature algorithm: RSA
10.1.3 Why implementing Certificate Authentication on OpenSSH
10.2.1 Setting up a FQDN domain
10.2.2 Generating Signing Keys
10.2.3 Generating Host Certificate
10.2.4 Configure server to use host certificate
10.2.5 Configure client to verify server certificate
Figure 1. Symmetric Encryption [1]
Figure 2 Asymmetric Encryption [1]
Figure 3 Advantages of Digital Signature
Figure 4 RSA Digital Signature [3]
Figure 5 Signing a document [4]
Figure 6 Signature verification process [4]
Figure 7 Issuing Certificate[14]
Figure 8 Logging in using certificates [14]
Figure 10 PKI Components and roles [8]
Figure 11 OpenSSH RSA certificate [12]
Figure 12 OpenSSH server certificate
Figure 13 auth /etc/hosts file
Figure 14 auth /etc/hostname file
Figure 15 Verifying parameters on auth
Figure 16 server /etc/hosts file
Figure 17 server /etc/hostname file
Figure 18 Verifying parameters on server
Figure 19 client /etc/hosts file
Figure 20 client /etc/hostname file
Figure 21 verifying configuration on client
Figure 22 Generating keys for signing host certificates
Figure 24 copying server public key to CA
Figure 25 signing server public key
Figure 26 Certificate generation output
Figure 27 command to copy generated certificate to server
Figure 28 Transferring certificate to server
Figure 29 Display sshd_config file on server
Figure 30 modified known_host file on client
Figure 31 Successful connection after certificate validation
2 Abstract
This report aims at introducing the concepts and mechanisms behind Digital Signatures and the security framework on which it is based on: Public Key Infrastructure (PKI).
A brief introduction to other cryptographic concept is also provided in order to provide a wide view of the security features adopted in the last years to recent. The concepts implied by PKI are then applied in relation to Secure Shell (SSH), an industry standard used by administrators for accessing systems remotely in a safe way.
The practical assessment, included in the Appendix A, will introduce step-by-step the actions required in order to create a Certificate Authority and generate signed host certificates, which will then be used to verify identify of servers to remote clients, removing the need of exchanging public keys between parties before communication.
The report will conclude with a brief reflection on the changes implied by the security features adopted nowadays, with an eye towards current researches and future implementations.
3 Introduction
The wide distribution of networked systems and the increasing usage of internet have heavily influenced today’s society, including businesses. In fact, several operations such as banking, sale and purchase of products and the exchange of information have emphasized electronic transactions, minimizing operations’ cost while enhancing productivity. This has identified information security as the major issue for any business or individual who exchange sensitive information, or perform operations, over an open environment such as the internet because there is a need to prevent such information from being tampered. Consequently, the need of enforcing the fundamentals of information security (confidentiality, integrity and reliability) during data transmission between communicating parties led to the creation of security features such as digital signatures, of which algorithms are based on the security framework called Public Key Infrastructure (PKI) .
4 Cryptography
Cryptography uses mathematical algorithms and processes to convert intelligible plaintext into unintelligible ciphertext, and vice versa. Applications of cryptography include:
- Data encryption for confidentiality
- Digital signatures to provide non-repudiation (accountability) and verify data integrity
- Certificates for authenticating people, applications and services, and for access control (authorisation)
There are two main kinds of cryptography: shared secret and public key.
4.1 Symmetric cryptography
In shared secret cryptography, sender and receiver use the same key for both encryption and decryption purposes. Because of this symmetry, it is critical to keep the key secret and to avoid network-based key distribution as an attacker could intercept the shared key and decrypt data sent from communicating parties.

Figure 1. Symmetric Encryption [1]
4.2 Asymmetric cryptography
Also known as Public key Cryptography, it uses a pair of keys: a public key and a private key.
The public key is publicly available, so it can be transmitted over insecure connection while the private key is kept private to the owner.
The pair of keys can be used for both encryption or decryption purposes, depends on usage.
To ensure confidentiality, the data is encrypted using the public key and can only be decrypted by the private key .
To ensure non-repudiation and integrity, the data is encrypted using the private key and can only be decrypted with the public key.
Distribution of keys between parties is greatly simplified using this protocol.
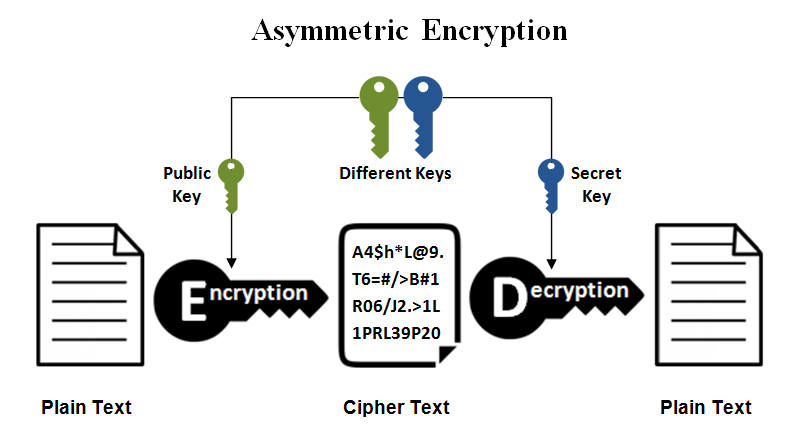
Figure 2 Asymmetric Encryption [1]
5 Digital signature
A digital signature is a set of enciphered data created using a cryptographic algorithm, based on the concept of public key cryptography, its main scope is to protect communicating parties against each other in a situation where there is no complete trust, and something more than authentication is required. [2]
The First model of digital signature was first introduced in the paper “New directions for Cryptography” (IEEE Transactions on Information Theory, 1976) where Whitfield Diffie and Martin Hellman presented the idea that a form of digital signature could be made using PKE in a way that anyone could verify its authenticity but no one else could duplicate it.
Most secure web transactions today are already dependent on digital signatures, which are included as part of the digital certificate a server presents to a client to identify itself and vice versa.
Example of current uses of digital signatures:
- Inter-bank payment systems (BACS, SWIFT,CHAPS .)
- e-passports and other e-id cards
- VPN and Remote host connections
- SSL enabled websites
- Signing documents (PDFs, Emails, etc)
5.1 Advantages
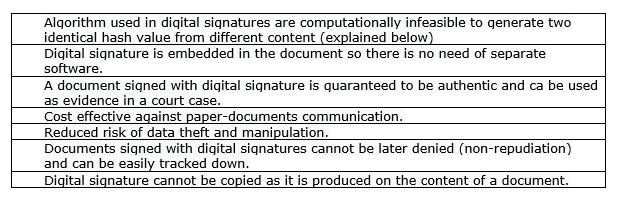
Figure 3 Advantages of Digital Signature
5.2 Disadvantages
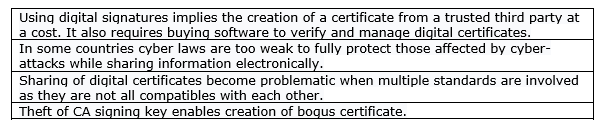
Figure 4 Disadvantages of Digital Signature
5.3 Attacks
It must be mentioned that the digital signature scheme does not offer complete security against data theft or data manipulation. Numerous researchers have identified some of the weaknesses embedded in such security implementation, for example:
- Signature verification attack – On windows host it is possible to bypass the certificate verification process on malicious data by modifying windows’ registry values.
- Dali’ attack – A sequence of bits could be interpreted under different formats producing different contents while still being recognised as authentic. This attack can take place on any OS.
More details about this technique can be found here and here .
- Public keys can be extracted from hardware devices using RSA signature as demonstrated by Renaud Lifchitz at Hackit Ergo Sum conf in 2014.
5.4 Digital signature algorithm: RSA
RSA in the most widely used asymmetric cryptosystem at present, it was first published by Ron Rivest, Adi Shamir and Leonard Adleman in 1977 and it relies on the difficulty of factorization of the product of two large numbers( https://en.wikipedia.org/wiki/RSA_(cryptosystem)) .
The algorithm used by RSA in digital signature can be represented as :
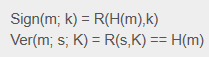
Figure 5 RSA Digital Signature [3]
Sign refers to the signing process of a message m, the RSA function is applied with the private key k to the hashes calculated H
Ver refers to the verifying process of a message m, here the RSA function is applied with public key K to the signature received and checked against the calculated hashes H.
In other words, the process of digital signing a document includes two steps :
- The content of the document to send is hashed using a strong algorithm such as SHA-256, outcome of this is a unique fingerprint ,also known as message digest, that is produced on the bits contained in the document, this means that if any of the bits is changed, the hash generated will be different from previous one .
- The hash value is padded to the same length of the RSA key being used and then signed by the signer’s private key using the RSA algorithm.
As illustrated in figure 5 :
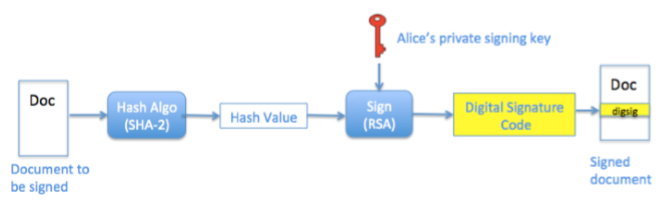
Figure 6 Signing a document [4]
On the other side, the receiver hashes the document received, the output is a new generated hash value. The signing process is reversed by using the public key of the signer, producing the hash value on which the digital signature was generated. Both hash values calculated from above processes are compared. If they match it means that the signature has been produced by the person owning the private key and that the content of the message has not been manipulated during transaction. If the hash values do not match then this means that the signature does not belong to the correct owner or that the content of the document has been manipulated, so it is considered invalid.
As illustrated in figure 6:
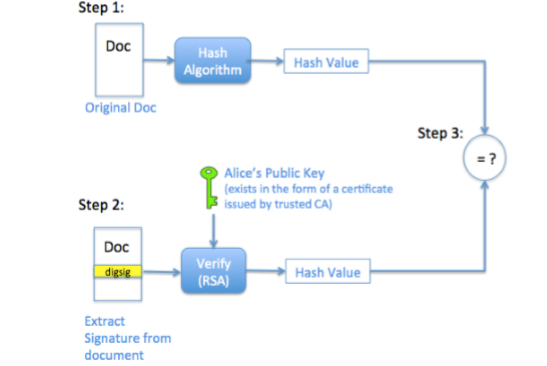
Figure 7 Signature verification process [4]
The challenge of the verification process on the receiver side is knowing with certainty that the public key indeed belongs to the sender, and not some imposter. In order to provide this trust, a third-party component called Certificate Authority (CA) is required to verify and ensure that a public key belongs to an entity.
The RSA public-key cryptosystem and digital signature scheme are widely deployed today and have become essential building blocks for creating the emerging public-key infrastructure (PKI) [5].
6 Digital Certificate
Digital certificates are digital identities issued by a trusted third party (CA) which binds a public key with an identity and enables a receiver to verify the sender’s digital signature .
The digital certificate carries the digital signature of the issuer of the certificate to enable the receiver to verify certificate legitimacy [5].
Figure 7 below illustrates how certificate are issued by the Certificate Authority.
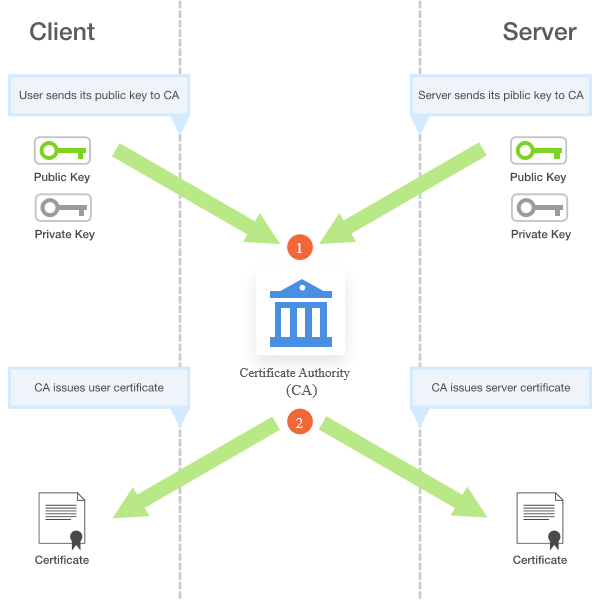
Figure 8 Issuing Certificate[14]
In regard to SSH, certificates authentication enables a host to verify its identity against a remote client without the need of sharing own public keys, avoid the typical error message about unverified identity .
The logging process using SSH certificates is illustrated in picture 8 :
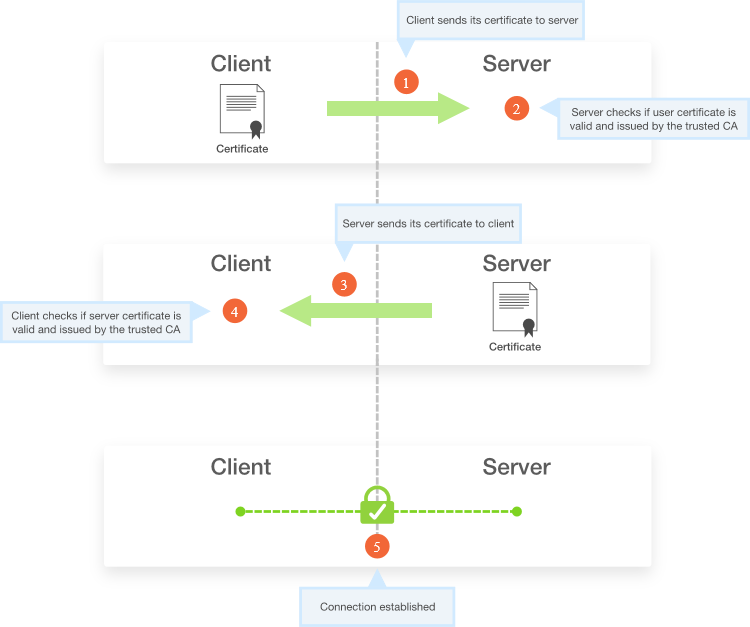
Figure 9 Logging in using certificates [14]
In order to request a certificate, the end-user must verify its identity to the CA providing official documents in a face-to-face meeting such as passports, driving licence, or information about themselves if this process is done electrically. A certificate can also be revoked by the CA in case there is a change of circumstances, e.g. the user is no more authorised to sign on behalf of an entity.
A problem related to using certificate is their time of validation. The issue raises when a signed document needs to be verified after the certificate expiration date. To overcome this issue, a timestamp is digitally signed by the Time Stamp Authority (TSA) and embedded in the signature, providing a way of ensuring validation of certificate at the time of signing.
A typical certificate is made from the following attributes:
- Certificate version
- Serial number
- Signature algorithm
- Owner’s name
- Owner’s public key
- CA’s identifier
- Validity dates (timestamp)
- Extensions (optional)
A common standard defining the format of public key certificates is called x.509, however OpenSSH supports it is own proprietary certificate which is presented in Certificate chapter of Appendix A, click here for redirection.
7 Public Key Infrastructure
7.1 What is PKI?
PKI is a security framework which consists of hardware,software,security policies and encryption mechanisms that generate,store,distribute and manage keys.
PKI also provides procedures to generate, distribute, and utilize digital certificates and offers the possibility to verify communicating parties in a reliable way [6].
PKI is based on the concept of encryption using Public and Private keys and extends its features by adding other managing functions, playing a central role in the security system for many applications as illustrated below :
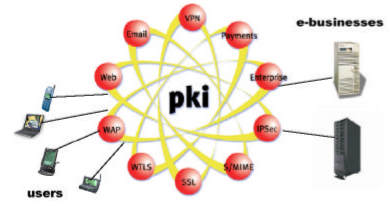
Figure 10 PKI uses
7.2 Why we need PKI?
In addition to the core security functions provided by public key cryptography, which are : confidentiality, non -repudiation, authentication and integrity, following features are needed for securing electronic interactions and communicating parties :
- Policies that specify rules for cryptography.
- Ensuring trusted relationships between communicating parties are established and maintained .
- Mechanisms for generating and managing keys and certificates in a medium/large scale enterprise.
Hence the requirement of creating an infrastructure capable of increasing security measures while allowing easy implementation of other services at any time.
7.3 Components and Roles
PKI requires additional requirements to PKC in order to provide its features, some of the most relevant components and their function are introduced in figure 8:
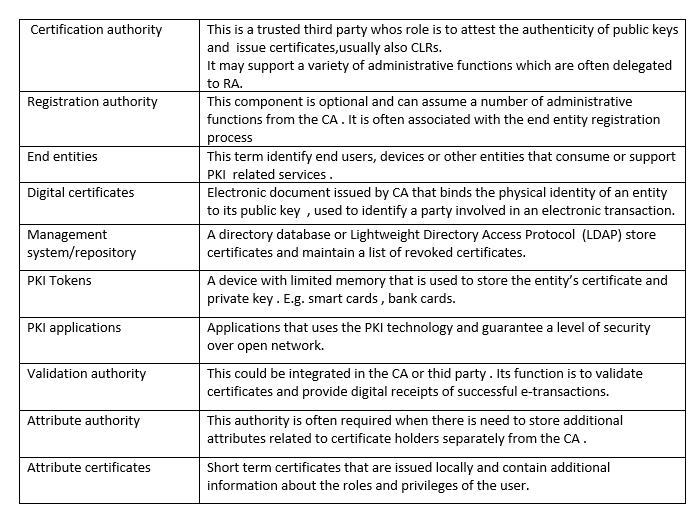 Figure 11 PKI Components and roles [8]
8 Conclusion
The future of digital signatures and PKI is looking brighter than some years ago, when non-electric transactions and operations were still preferred by majority of businesses.
Along the years, due to the increasing exchanging of electronic information over the public network from end users, which is directly proportioned to the increase of cyber attacks, the importance of securing electronic data has become the main target for anyone dealing with such issues.
The efficiency of PKI has guaranteed to more and more enterprises the possibility to move their operations and infrastructure over the internet, including cloud applications and IoT devices, as it offers a stronger sense of security for the transmission and reception of sensitive data and addresses problems that were left unresolved by older security implementations.
Moreover, the publication of detailed documentation about the implementation of PKI has helped demystifying the complexity of its structure, while reduced costs and challenges for implementing and supporting PKI-enabled applications has helped spreading the use of such measure.
If considering future implementations, I strongly believe that in a couple of years the majority of IoT devices, handheld devices and cloud-based services will rely on digital certificates for identification and authentication, as these appear to be the major trends that are driving the deployment of PKI-enabled applications due to their influence on business’ operations, other factors are the lack of old applications PKI-compatible and the resources and skills required to implement this framework.
9 References
[1] https://www.ssl2buy.com/wiki/symmetric-vs-asymmetric-encryption-what-are-differences
[3] https://www.cs.cornell.edu/courses/cs5430/2015sp/notes/rsa_sign_vs_dec.php
[4] https://www.signinghub.com/wp-content/uploads/2017/05/Basics-of-Digital-Signatures-and-PKI-s.pdf
[5] www.drdobbs.com/rsa-digital-signatures/184404605
[6] https://horseproject.wiki/images/d/dd/PKI-Primer.pdf
[7] https://www.e-reading.club/bookreader.php/142115/Public_Key_Infrastructure_implementation_and_design.pdf
[8] ] https://www.oasis-pki.org/pdfs/PKI_Basics-A_technical_perspective.pdf
[9] https://www.openssh.com/
[10] https://www.ssh.com/ssh/protocol/
[11] https://www.ists.dartmouth.edu/library/87.pdf
[12] https://cvsweb.openbsd.org/src/usr.bin/ssh/PROTOCOL.certkeys?annotate=HEAD
[13] https://blog.habets.se/2011/07/OpenSSH-certificates.html
[14] https://gravitational.com/blog/ssh-key-management/
file:///C:/Users/user/Desktop/UNI%20STUFF/1ST%20COURSEWORK%20-%20DIGITAL%20SIGNATURES/understanding_pki.pdf
10 Appendix A
This section includes documentation for the practical part of this coursework .
10.1 Scenario
Objective:
- Implementing Host Certificate Authentication on OpenSSH
- Verifying the host identity to a client on first attempt of connection.
Benefits:
- Ensuring the entity of a server, avoiding confusing messages about its authenticity.
- Protection against MITM
- Timesaving compared to setting up a centralised authentication authority such as LDAP.
- No need for the user to send the public key to every hosts that he is trying to connect as the CA public key is enough to verify identity.
Requirements:
- A Virtual machine framework such as VirtualBox.
- Three UNIX based VMs such as Ubuntu 18.04 VM for emulating the CA, the server and the client.
- A VM-only network configured on VirtualBox network manager with DHCP enabled.
- Latest release of OpenSSH (7.9 at time of writing) installed on all machines.
- Fully qualified domain name set on all VMs.
Installation of VM frameworks, VM hosts and setting of vm-only network is left to the user .
10.1.1 What is SSH Protocol
The SSH protocol (also referred to as Secure Shell) is a method for secure remote login from one computer to another. It provides several alternative options for strong authentication, and it protects the communications security and integrity with strong encryption. It is a secure alternative to the non-protected login protocols (such as telnet, rlogin) and insecure file transfer methods (such as FTP) [10].
10.1.2 What is OpenSSH
OpenSSH is the premier connectivity tool for remote login with the SSH protocol. It encrypts all traffic to eliminate eavesdropping, connection hijacking, and other attacks. In addition, OpenSSH provides a large suite of secure tunneling capabilities, several authentication methods, and sophisticated configuration options [9].
10.1.3 Why implementing Certificate Authentication on OpenSSH
Standard configuration of OpenSSH is based on key exchange authentication. The first time an user connects to a server, the server forwards its public key but the issue is that the user has no way to verify if the key matches the intended server. So an attacker could possible perform a MITM attack intercepting the connection between the two parties and send his own public key and signature instead in response to the user request of authentication. Upon user authentication, the password is sent to the attacker instead of the designated server .
If the client has already authenticated once with that designated server, it should have the server’s public key stored on his device and so the user will generally receive a warning such as “server’s key has changed. Continue?” Majority of the users usually replies ‘ Yes’, ignoring the risk [11].
Implementing certificate authentication prevent the threat of man in the middle attack as the identity of communicating parties can be verified upon attempt of connection .
10.1.4 Keys
All key pairs are RSA generated by using the ssh-keygen command.
In order to easy the realisation of this project, passphrase protection was not implemented .
This security feature is used to prevent the threat of misuse in case a private key falls into an unauthorized possession, so it is highly reccomended in a real wold scenario.
10.1.5 Certificate
OpenSSH does not support PEM ,x509 ASN.1 or other formats but only its own proprietary certificate.
This implies that the pair of keys cannot be signed by any root CA, like Verisign, and that multiple levels of CA cannot be used [13].
A representation of the certificate’s structure adopted by OpenSSH is illustrated in figure 8:
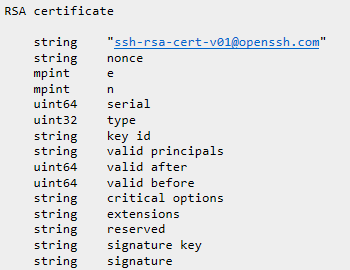
Figure 12 OpenSSH RSA certificate [12]
e field indicates the RSA exponent
n field indicates the public modulus used .
Serial is optional and referes to serial number set by the CA for the current certificate.
Type specifies if the certificate identifyes a user or a host .
Key id is a field compiled by the CA at time of signing and it is used to identify an identity mainly on log messages.
Valid principals is a field that specify the names to which the certificate is valid. If left to zero the certificate is valid for any principal of the type specified .
Valid after and valid before specify the validity period of the certificate
Critical options can be set to zero or include other key options that are used to verify validity of a key .
Extensions can be set to zero or include other options, if not recognised these options can be ignored.
Reserved field is currently unused in this protocol version .
Signature key field contains the CA’s key used to sign the certificate .
Signature field contains encoded results of all previous fileds according to the rules set by CA .
A representation of the actual host certificate generated for the server VM named server.example.com
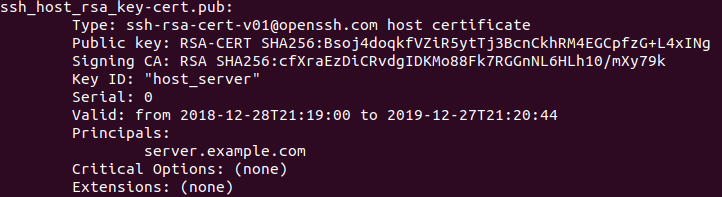
Figure 13 OpenSSH server certificate
10.2 Procedure
10.2.1 Setting up a FQDN domain
In order to be able to reach every host in the VM network by using their hostname instead of their IP address, we need to set up a fully qualified domain name. In order to do so, follow these instructions on all machines:
- Modify /etc/hostname file to specify hostname .
- Modify /etc/hosts file to specify domain name and address of relevant machines.
In this scenario:
the domain name is set to be: example.com
The CA machine hostname is: auth
The server machine hostname is: server
The client machine hostname is: client
Following are illustrations of the modified configuration files:
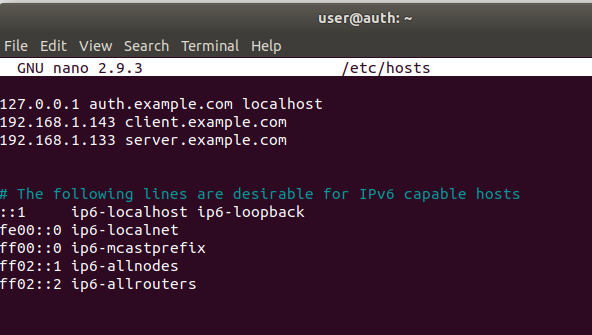
Figure 14 auth /etc/hosts file
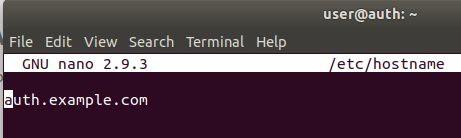
Figure 15 auth /etc/hostname file
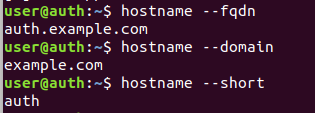
Figure 16 Verifying parameters on auth
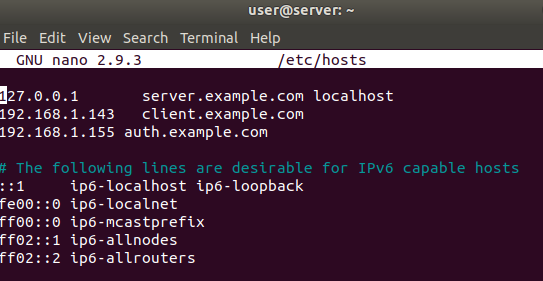
Figure 17 server /etc/hosts file
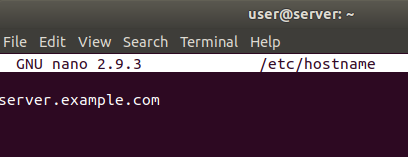
Figure 18 server /etc/hostname file
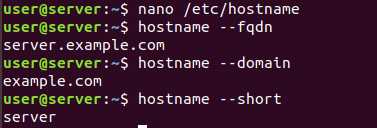
Figure 19 Verifying parameters on server
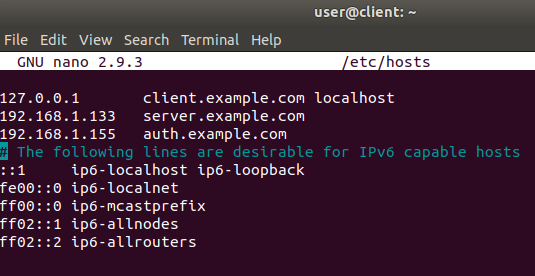
Figure 20 client /etc/hosts file
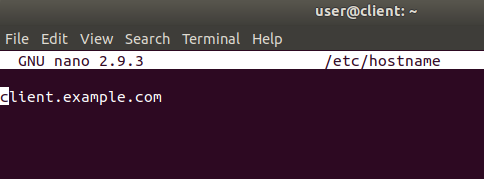
Figure 21 client /etc/hostname file

Figure 22 verifying configuration on client
10.2.2 Generating Signing Keys
Generate RSA keys on the CA auth by tipying the following command as sudo :
ssh-keygen -f server_ca
-f parameter specify the name of the output file.
As illustrated in figure 22:
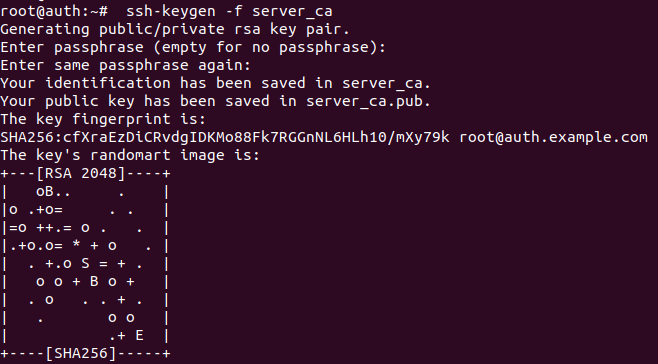
Figure 23 Generating keys for signing host certificates
This command will generate two keys : server_ca and server_ca.pub which are the private and the public key.
These will function as signing key for issuing certificates.
Type ls in terminal for verifying the generated keys in local directory :

Figure 24 Show generated keys
10.2.3 Generating Host Certificate
Now that signing keys are generated, we can begin with signing the hosts keys.
First step is to copy the public key of host server to the local working directory in auth.
This key is automatically generated on the host and stored in /etc/ssh/ folder upon ssh installation.
The key is copied by using scp command, specifying the user and host destination:pattern/of/public/key and destination path which is “. “ (in linux. is an abbreviation for local working directory)
Type the command illustrated in picture 24 and press ENTER :

Figure 25 copying server public key to CA
You will be asked for the root user credential of server machine. Enter password and press enter.

Now we can create the certificate for the host server by typing the following command :
ssh-keygen -s server_ca -I host_server -h -n server.example.com -V +52w ssh_host_rsa_key.pub
as illustrated in figure 25:

Figure 26 signing server public key
-s parameter specify the CA key (server_ca)
-I specify the certificate identity (host_server)
-n specify principals (server.example.com)
-V specify validity interval (1 year)
File (ssh_host_rsa_key.pub)
If the operation is successful, an output like the one shown in figure 26 will be generated:

Figure 27 Certificate generation output
This means that a ssh_host_rsa_key-cert.pub certificate was created for server.exampe.com and is valid for one year.
Now we copy the generated certificate to the server machine with scp command, specifying the file to transfer and the destination path, like in figure 27:

Figure 28 command to copy generated certificate to server
As before, we will be asked to enter the credentials for the root user on server, once entered the certificate will be transferred to server, like in figure 28:

Figure 29 Transferring certificate to server
Now we can proceed with deleting the server public key and generated certificate on auth by typing the following command :
rm ssh_host_rsa_key.pub ssh_host_rsa_key-cert.pub
An illustration of the generated certificate :
10.2.4 Configuring server to use host certificate
In order to make the server aware of the certificate generated, modify the sshd_config file on the server at /etc/ssh/ and add the following line at the end of file :
HostCertificate /etc/ssh/ssh_host_rsa_key-cert.pub
Once completed, the sshd_config file on server should look like in figure 29:
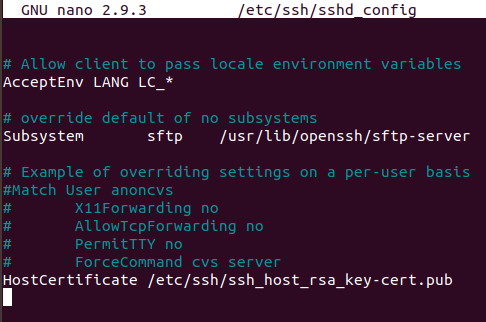
Figure 30 Display sshd_config file on server
Now restart the SSH service for the changes to apply by typing :
sudo service ssh restart
10.2.5 Configuring client to verify server certificate
Now we need to instruct the client on how to verify the certificate that the server will present upon attempting connection .
Create or modify the known_host file on the client machine situated in the hidden directory at ~/.ssh/known_hosts by typing :
nano ~/.ssh/known_hosts
Delete all content of the file and add this prefix :
@cert-authority
Following by any domain restriction, in this case I put *.example.com
And the public key of CA used for signing certificate which can be found at ~/server_ca.pub on auth machine .
Once completed, the known_host file on client should look like in figure 30 :

Figure 31 modified known_host file on client
10.2.6 Connecting
Now, when the client tries to connect to the server using its full domain name, he will not be asked if the remote host is trusted because the host will present its certificate which is signed by the same CA that both machine trusts .
Like shown in figure 31:

Figure 32 Successful connection after certificate validation
Complete !
If you want to take this process further, the next step will be to authenticate users on client machine to server host so that authentication details will not be asked upon connection. For further details about this process, visit this page .
Cite This Work
To export a reference to this article please select a referencing stye below:
Related Services
View all


DMCA / Removal Request
If you are the original writer of this essay and no longer wish to have your work published on UKEssays.com then please click the following link to email our support team:
Request essay removal