Distance Meter Using Ultrasonic Sensor
| ✅ Paper Type: Free Essay | ✅ Subject: Engineering |
| ✅ Wordcount: 1520 words | ✅ Published: 18 May 2020 |
ABSTRACT:
This project is about to measure a distance using ultrasonic sensor and Arduino Leonardo. First of all in this electrical world almost everything we are using is automatic so me and my friend decided to make a project regarding to the distance measurement because in today world this type of technology will helps a lot so that we make this project which name is distance meter using ultrasonic sensor. Here this project is looks like simple but it doesn’t because we phase many difficulties when making this project. Main heart of the project is the Arduino Leonardo we can see this in detail in next topic. For the distance measurement we have plenty of tools are available in the market like distance tape and tape wheel and many more but all that are manually operated so the we had decided to make this project so if we can measure distance automatically so that is very useful.
- INTRODUCTION:
Our project is to measure distance by using an ultrasonic sensor and Arduino Leonardo. This project is very simple in listening but it is complicated in the real life because in the real life any measuring distance tool are available but none of them are automatically so that we have make this project.in this project we have used Arduino Leonardo and ultrasonic sensor here Arduino Leonardo is the heart of the project which stores the project memory like coding and other stuff. Here in this project we have used ultrasonic sensor which working principal is very simple the transmitter transmit the high frequency noise and that wave is reflected by the block or thing then the wave turn back to the ultrasonic sensor and after that receiver receive that signal and microcontroller save that time and from that micro controller measure that distance by using the travel time of the wave here we need to divide that time by two because wave travel two time to that distance so that we can get the accurate distance.
- USING COMPONENTS:
- Ultrasonic sensor (HC-SR04)
- Arduino Leonardo
- 8*8 dot matrix led 4 in 1 module
-
Jumper wire
-
ultrasonic sensor (HC-SR04)
- Features
-
ultrasonic sensor (HC-SR04)
Ultrasonic sensor HC – SR04 provides 2cm – 400cm measurement function. The modules includes ultrasonic transmitters, receiver and control circuit. The basic principle of work:
1.Using trigger for 10us high level signal.
2.The module automatically sends eight 40 kHz and detect whether there is a pulse signal back.
3.IF the signal back, through high level , time of high output IO duration is the time from sending ultrasonic to returning.
4.Test distance = (velocity of the sound (340M/S)/2


2.2.2ELECTRICAL PARAMETERS
|
Working voltages |
DC 5V |
|
Working current |
15mA |
|
Working frequency |
40 Hz |
|
max range |
400 cm |
|
Min range |
2 cm |
|
Measuring angle |
15 degree |
|
Dimension |
45*20*15mm |
1.2 Arduino Leonardo
Arduino Leonardo is a microcontroller developed by Arduino.cc. It is built on the ATmega32U4 and comes with 20 digital input/output pins that stay enough to connect with external devices and turn your uprising into truth. The Microcontroller on the board includes a built-in USB, so we can use of a secondary processor. The USB help Leonardo cover the mouse or keyboard when it is connected to a computer. The module supports the crystal oscillator with the frequency up to 16 MHz that is enough to generate clock pulses with decent pace required for the organization of all the internal operations.
[1]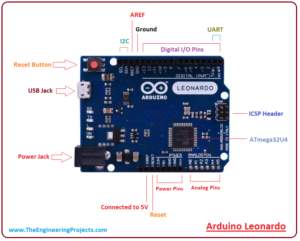
1.3 8*8 dot matrix four in one module: (MAX 7219)
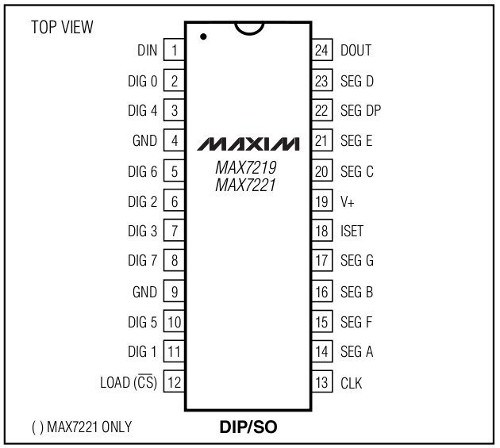
Features and Specifications
- Operating voltage: +4.0 to +5.5V
- operating voltage: +5V
- Maximum voltage: 6V
- Maximum current allowed each segment pin: 100mA
- Maximum current allowed ground pin: 500mA
- Data-to-Segment Delay Time: 2.2mSec
- Operating temperature: 0°C to +70°C
- Storage Temperature: -65°C to +150°C
[2]
- SOFTWARE DISCRIPTION:
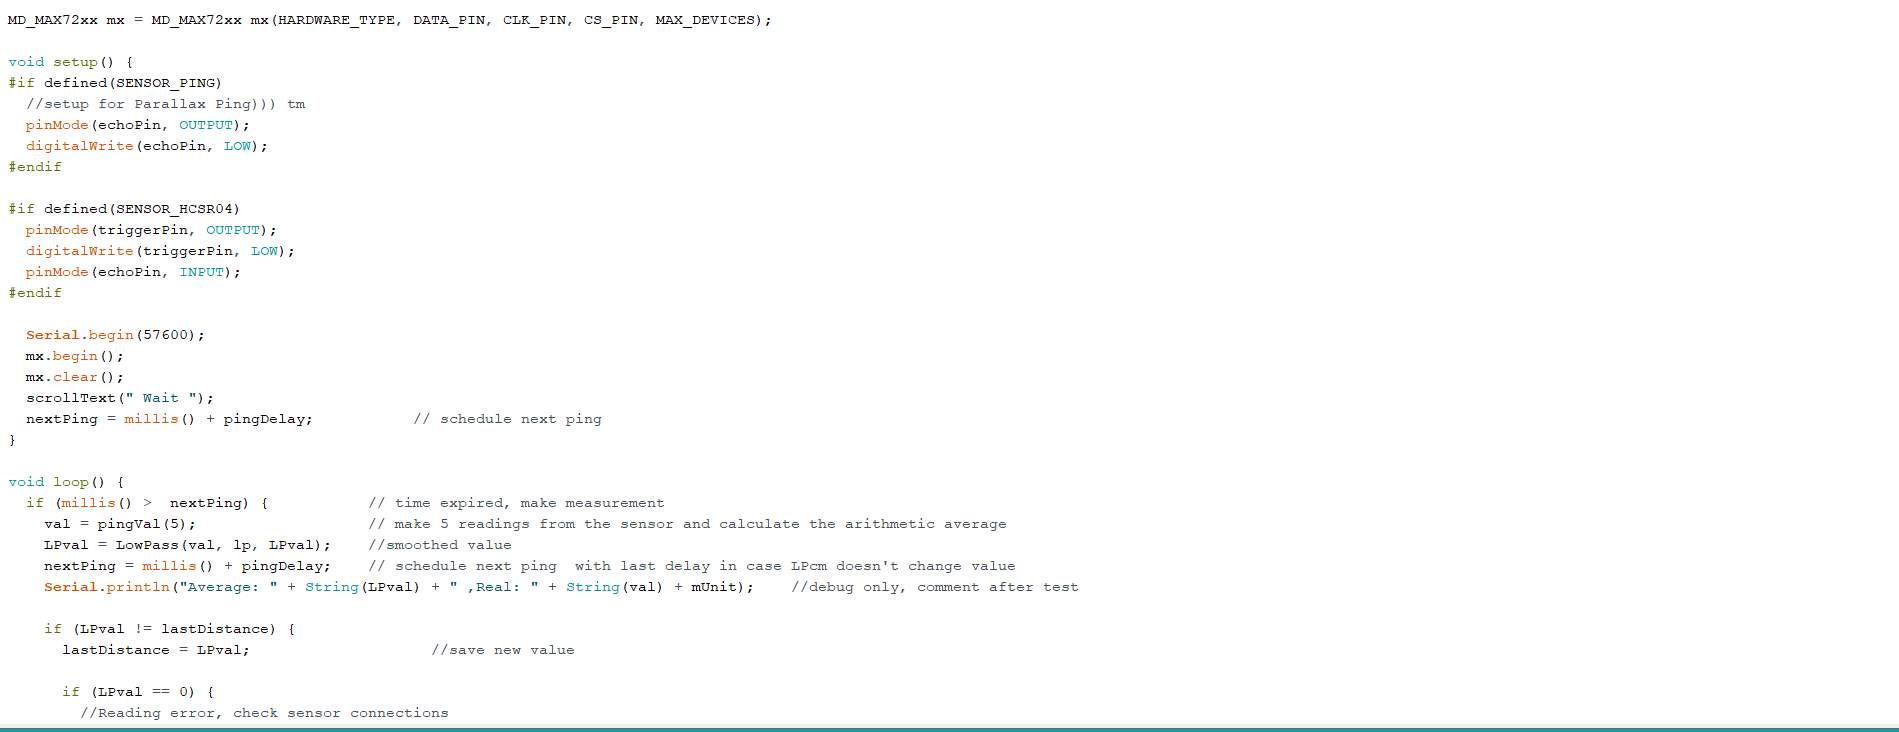
Here for this project we did not used proteus because in the proteus we can not have enough libraries for we can find the Arduino Leonardo and also we cannot find the dot matrix 7219 so that we are not able to do the work on the proteus but we have one another tool that is called Arduino IDE here in this tool we have done programming but the main drawback of this tool is that we can not simulate the programme in it and also we can not get any idea about how programme works so that after building the project coding me and my friend directly upload coding on the hardware and it works fine so mainly me and my friend are using Arduino IDE for uploading the programme.
Here some picture of the Arduino IDE and coding of the project. 


-
METHODOLOGY:
- BLOCK DIAGRAM

3.2 IMPLEMENTATION:
The technique of the distance measurement in this project is simple. Here for distance measurement we are using the ultrasonic sensor and ultrasonic sensor mainly depends on the waves here this ultrasonic sensor produces high frequency signal which is transmitted by the transmitter and after transmitting this signal collide with the obstacle in the way and after that the signal will reflect by that object and receiver receive that signal and Arduino collect the time difference between the outgoing wave and incoming wave and after that using that time we can measure the distance of the object because the speed of the signal is limited which is 380m/s and from that we can discover that for how much distance how much time will be taken by the waves so that we can find the time consuming and also the distance of that object but it is now doubled because the time taken by the signal is two times more because signal travel two times so that we need to divide that time by two so that we can get accurate value.
- RESULT:
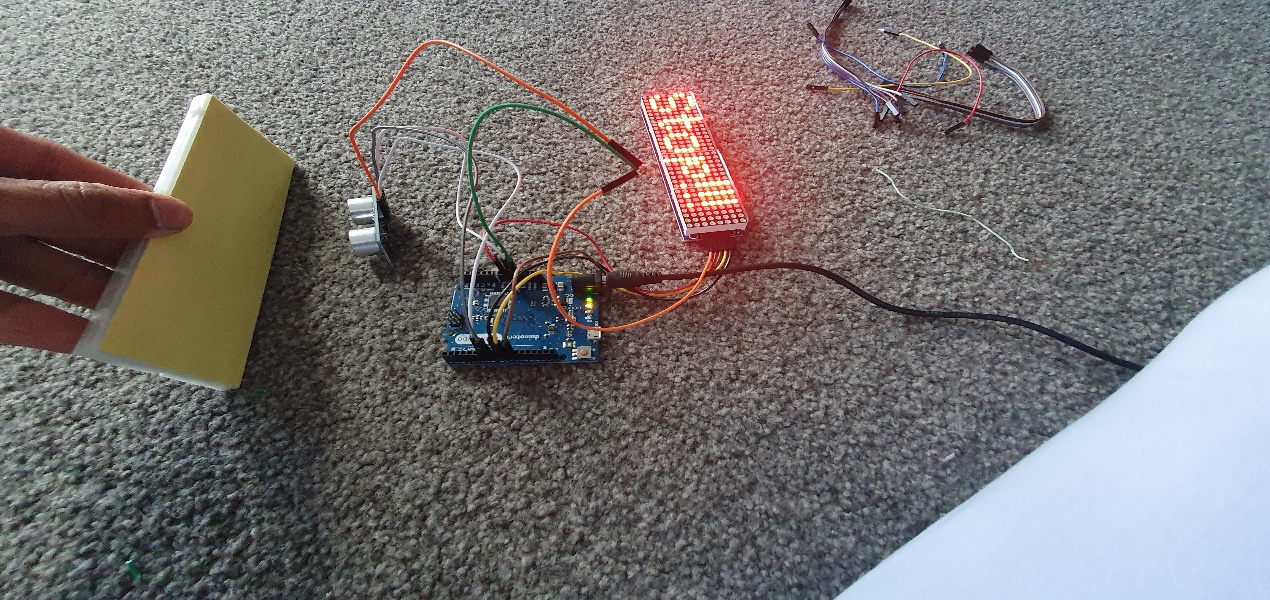
The working model of the distance meter using Arduino using ultrasonic sensor was successfully designed and implemented. The performance of this system is also analyse in the different connection. The ultrasonic module run fine and gives the output with the accuracy of the 2 cm and till up to 70 cm here ultrasonic sensor can work till 400 cm but in the real life small obstacle are in the way so that it cannot detect up to 400 cm. here in the displaying unit max 7219 dot matrix display works fine and gives appropriate output and also it works fine. Overall total project works fine and gives output as expected.
-
APPLICATION :
- The main application of this project is to measure a distance automatically so it can be used in the garage parking.
- This project can be used in the medical terms for measuring the distance of some clots with using ultrasonic sensor
- Can be used at the tool plaza of the expressway.
- CONCLUSION AND FUTURE SCOPE :
CONCLUSION
The objective of this project was to design and implement an Ultrasonic Distance Measuring device. As described in this report a system is developed that can calculate the distance of the tracked object. With respect to the necessities for an ultrasonic rangefinder the followings can be concluded.
1. The system can calculate the distance of the block with accuracy.
2. This offers a low cost and effective solution .
FUTURE SCOPE:
The range can be considerably increased by using high power drive circuit.
1.Using temperature compensation, it can be used over wide temperature range.
2. The resolution of the measurement can be improved by incorporating phase shift method along with time of flight method.
3. Can be used in parking assistance system in vehicles with ultrasonic transmitter.
8.CHALLENGES IN IMPLEMENTATION:
- First challenge of this projectis the coding and also the time because we have done this projectin just 4 weeks and in this project we need to do presentation and also we need to make a simulation as well as working model and after all this we have one another problem in coding because we are confuse in tdhe unit because ultrasonic sensor can sense upto 400 cm but if we want this in the inche we need to recalibrate it and after so many discussion we are doing this project in the centi meter.
- After solving this problem of unit we get another problem of the led because when we first buy the dot matrix display each and every dot matrix has its own ics so that we can not connect easily and also it will consume more power instead of the 4 in 1 module so after facing this problem we hae buy one another 8*8 dot matrix but it is 4 in 1 module s it has only one ic so that we can easily give it command and also we can see very great output which is not showing in the 4 different 8*8 dot matrix.

9. REFERENCES :
References
|
[1] |
e. project, “theenngineeeringproject.com,” 25 11 2019. [Online]. Available: https://www.theengineeringprojects.com/2018/10/introduction-to-arduino-leonardo.html. [Accessed 2 2017]. |
|
[2] |
C. 101`, “https://components101.com,” [Online]. Available: https://components101.com/ics/max7219-pinout-specs-datasheet. |
MODEL DEMONSTRATION:

Cite This Work
To export a reference to this article please select a referencing stye below:
Related Services
View all


DMCA / Removal Request
If you are the original writer of this essay and no longer wish to have your work published on UKEssays.com then please click the following link to email our support team:
Request essay removal