Technological Questions for Photography
| ✓ Paper Type: Free Assignment | ✓ Study Level: University / Undergraduate |
| ✓ Wordcount: 8636 words | ✓ Published: 06 Jun 2019 |
Questions About Photography
- What are the different file types for images, and what the pros/cons for each?
There are many different file types for images. All of them have advantages and disadvantages, and do you need to find the correct one for the shot you have taken. You need to be able to switch between them without too much trouble, to make sure you have the most benefit out of using one of them.
Raster images are images that use pixels that are each assigned a colour. They display that colour, and enlarged, they stretch. This means that they get pixelated/blurry. They are resolution dependent. These images are used for photographs, artwork, and images for the internet (social media banners, etc). CMYK and RGB are the two main primary colour models for raster images. CMYK (Cyan, Magenta, Yellow, Key – black) is used for printing, as these are the colours printers combine to make all of the different colours. RGB (Red, Green, Blue) are the primary colours that pixels use to display a certain colour. These images are optimised for viewing anything that stays on a screen and are light-based. Each raster images is also either lossy or lossless. Lossless means that the image will not lose any details that it was given in the first place. If they are compressed, they will be able to be rebuilt, back to its original condition. If an image is lossy, it means that the image will look for similarities in colour or any unnecessary details. When this is done, the file size will shrink dramatically, but the image might lose a bit of quality.
Vector images are images that use maths equations to pinpoint a certain location and can be assigned a colour, thickness, stroke type. You do not lose any quality or get pixilation in the image when resizing it, because it is resolution independent. There is no such thing as a lossy or lossless vector image. Vector images do have negatives though. These include any errors in the image show up when scaled larger, because it is based on calculations, you need a powerful computer to process all of the data, and they can’t be used for real-world photos. They can, however, be used by both real-world photos and drawn images (mixed compositions).
- PNG (Portable Network Graphics) images (.png) were invented by Microsoft to replace GIF images. PNGs have 16 million colours as well as transparency. They can shrink to a small size, which is why they are becoming standard for on the internet. If the photo has a lot of colours, the file size will increase dramatically. This is not good if you want a small image size.
- JPEG/JPG (Joint Photographic Experts Group) images (.jpg, .JPG, .jpeg, .JPEG) are used for large depth of colour images that are used for websites on the internet. The images can be compressed a lot but become pixelated the more the compression. JPEG images are not able to have a transparent background. They must have a solid colour background. JPEGs also don’t have layers, so once you save an image as a .jpeg you will not get the layers back – they are flat images.
- GIF (Graphics Interchange Format) images (.gif) are able to be animated. They are a widely used web image format. They are famous as being used for memes. GIF images only have 256 colours, so it is bad for artworks or photos that have many colours and they are not good quality. They do have small file sizes and transparent background compatibility. GIFs are also flat images, meaning that they don’t have different layers.
- TIFF/TIF (Tagged Image File Format) images (.tiff, .tif) are lossless raster format. They are extremely high quality, and file sizes are enormous. These types of images are used for desktop publishing, high-quality scans, professional photographs with digital cameras, and high-quality print graphics. Because of there massive file size, you shouldn’t use them on the internet.
- RAW images (.raw, .cr2, .crw, .nef, .orf, .sr2, .dng, and more) are uncompressed data that digital camera has taken. These images have huge file sizes, as they haven’t been processed. They have the highest quality possible. They are meant for photo editing. When you have edited them and they are ready for the internet, etc. then convert them into JPEG or PNG for best results.
- PSD (Photoshop Document) images (.psd) are from photoshop, and they keep all layers. These types of files are ideal for editing photos, as they keep all of the information they are given in photoshop. They are mainly for raster images, but they can also contain vector images. These images can then be exported to all of the image file formats above.
- EPS (Encapsulated PostScript) images (.eps) are primarily vector images (although they can store raster images) that has 1 design element that can be used in another design, usually larger. They will always be the right resolution no matter what size it is. They cannot be used online though.
- AI (Adobe Illustrator) images (.ai) are vector images that are made/edited by Adobe Illustrator (the main vector image editor). They can be exported as both EPS and PDF formats and also JPEG, PNG, GIF, TIFF and PSD for use on the web and editing in other programs (changes to raster format). They’re perfect for created and editing logos and icons. If you want to edit a raster image, Adobe Photoshop has many more options for those sorts of images.
- What impacts do different angles have on each type of photograph?
Angles are incredibly important when taking a photo. To take photos at different angles, you move the position of the camera and/or the position of the photographer. This means that the frame of the photo is different to when you started.
- Get low and look up at an object. This will create a look that makes the picture seem larger than it actually is. Gives the audience an ‘ant’s perspective’ of the object. Gets a lot more sky into the photo. Great for reflections in the water, as you have to get low for that to work. You just need to be really careful that you don’t drop the camera in the water. If it has strong leading lines, getting low will help to emphasise the sense of depth and perspective.
- Shoot from a high vantage point. This makes the photo look like a bird is looking down on the subject; bird’s eye view/perspective. This makes the subject of the photo look much smaller and less intense that it actually is. If you’re taking a photo of a spiral stairwell, it’s great to look at it down from the top.
- Look straight up. This angle makes the object look extremely tall and shows massive sense of depth. Make sure that there is good balance between the subject of the photo and the background of the photo. If looking up at trees or tall buildings, make sure you get enough sky in it, otherwise the photo looks crowded.
- Shoot from waist level. This is a discreet way of taking secret photos, so your subject doesn’t know, and they act naturel. Their main purpose is to take street photos of people walking by. Adds an eerie sense to the picture. This may be a little bit tricky at the start, as you have to ‘shoot blind’, which is not looking at/through the view finder before you take the photo.
- Capture many photos with many different angles of the same subject. This creates the impression that the object/subject that you are taking a photo of is different every way you can look at it. When the object is in motion (moving) it is best to take the subject many times differently, but with the same background. This means that the viewer asks questions to themselves about what is happening in the picture. This grabs the viewer’s attention and keeps them interested. When photographing a famous piece of artwork, always try and find different angles and perspectives to everyone else. This helps your photo to stand out.
- Shoot from an extremely close perspective. If this is done correctly, it will intrigue the viewer and they will continue to look at the photo for a while. Fill the entire frame up with the subject, and it will look fascinating. To take a photo of a subject, place it in front of a background and blur the background. This draws the viewer’s attention to the object in focus and the photo looks professional. This is great for advertising a product and taking a photo of it.
- Shoot through another object. When shooting through glass with rain on it (frosted and/or patterned glass), it blurs the subject on the other side of the glass which creates a distorted view of the subject. This interests viewers. Focus on the water droplets on the glass to make them look sharp, and the subject behind the glass will loo slightly blurred. This makes an awesome effect on the subject.
- Shoot through a frame. To do this, get anything that can let the viewer know what the subject of the photo is. This could be trees and branches which has a bird flying through the sky in between them. They do not have to be on every side of the photo or black or white, it can be anything. Doors, windows, archways, holes, branches, etc. Even get a huge object in it, with the bottom half of the screen visible. The audience who are looking at the photo will automatically be drawn to where the object isn’t at, so it’s a perfect way to draw their attention to something in the scene.
All of these angles are fantastic for different things that you want to take a photo of and are great for getting the viewer more involved in the image; and that’s what you want.
- What is white balance, and how can I use it to my advantage to make my photos better?
White balance is what temperature the colours are in the photo that you are taking. This means that when you take a photo, the white can be warm (yellow/orangey), cool (bluey), or just right (neutral). This neutral white is true white, which is what you want your photo to have (although there are some cases where you don’t want your photo to look like that).
If taking a photo in fluorescent lighting, and you want neutral white, you need to counterbalance the blueish effect of the light in the photo. This is done by setting the white balance to the Fluorescent mode on the camera. The camera will automatically warm up the shot for you, so the photo comes out looking correct.
If taking a photo in incandescent lighting from a normal bulb, and you want neutral white, you need to counterbalance the yellow/orangey effect of the light in the photo. This is done by setting the white balance to the Tungsten mode on the camera. The camera will automatically cool down the shot for you, so the photo comes out looking correct.
To take manual white balance shots, you hold up a white piece of paper to the camera, so it knows what white is. Then, set the white balance setting to Auto and take the piece of paper away. Quickly, take the photo, and it will turn up a lot truer white. Most cameras can do this, but some can’t. Make sure you look for the setting, as it’s super useful when you use it correctly.
I can use these to make my photo better by making the colours look correct to the human eye. This means that the picture will be able to transfer the meaning of it to the viewer, without it being disrupted from the wrong colour. All colours are affected when the wrong white balance is happening, not just white. White is just the main colour that looks different.
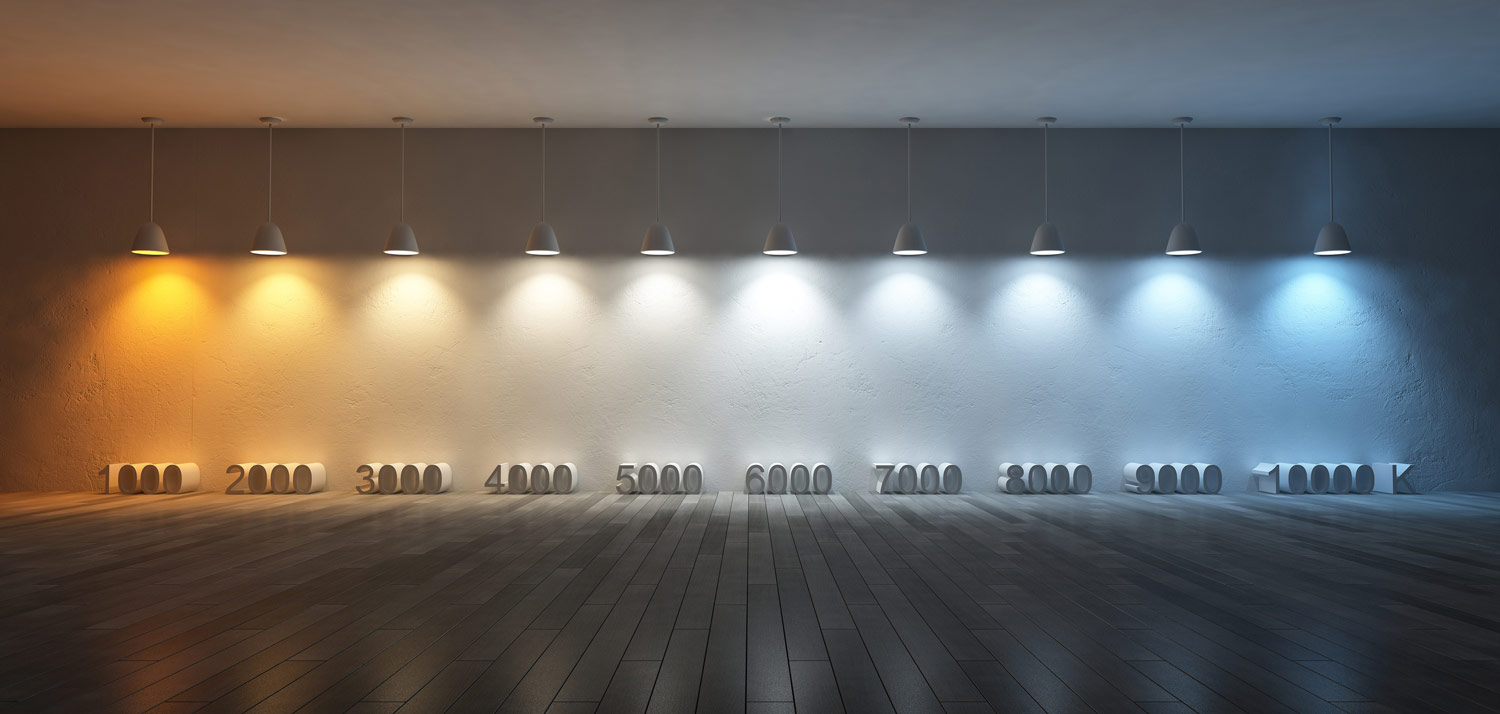
This is the Kelvin Scale of lighting. The warmer the lighting, the lower the number. Shade is usually 7500K, sunset colour is usually around 2500K, and daylight is close to 5500K.
- What impacts does different lighting have on a photo and does it make the photo have more impact?
Lighting is a very useful tool when taking a photo. Lighting can have many effects on a photo, so you need to know how to use it correctly to make the most out of what you’re shooting. There are 4 main rules with light:
- Light travels in straight lines. This means that when a light source is producing light, there are many light rays that shoot out, but they all travel in a straight line until it hits another object which could make it bend or reflect. It then comes through the object and begins traveling in a straight line again (rectilinear).
- If the light source is moved further away from the subject, the subject will receive less light than if it was closer. You can make an object have less light on it if you move either the light source of the object further away from each other. The light rays coming from the light source will spread out as they go further away from the light source, which makes the object have less light shining on it. This is done to make the object seem darker and have shadows which can have quite dramatic effects on the photo.
- The larger the light source relative to your subject, the softer the light. This happens because if the light source is larger than the object, the light will spread around the object which makes the object look well lit. Part of the light is creating shadows, whereas another part of the light is filling in the shadows. You will get a nice gradual light decrease, rather than light at a certain point. You can make soft light by using reflectors and secondary light sources, etc. If light is narrowed to one point on an object, it is harsh, whereas it is the opposite for broad light (closer light source).
- Lighting from the front de-emphasizes texture. Lighting from the sides, above, or below emphasizes it. When the light is directly in front of the object, it brings out all of the detail. This is because all of the creases can’t hide, and they are visible. There are no shadows to conceal any details. These photos are not original, so most of the time are boring and flat to a viewer. If the light source is shining on the object from the side, it creates shadows and depth, which interest the viewer. If shooting from the back, it makes the object look dark. This is because all of the bright light is shining around the object, and the camera automatically adjusts to the bright light, rather than the subject. This is why when you try taking a picture like this, you need to be super careful.
Lighting Intensity is also very important. Whether your light is harsh or soft against your subject can severely change what the photo comes out looking like. You can change the position of the light source to change where the shadows go, but you also need to be able to change how dark or light the shadow is and how dark or light the subject is as well.
- Hard light is when there is not a lot of transition between light and dark. It is a sudden change. Hard light is usually associated with darker and deeper shadows against your subject, but it doesn’t have to be. Hard light usually creates more of a contrast in the picture, and if used correctly, it can make a dramatic scene. A hard-light light source is either far away, to make a less smooth transition between shadows and light, or it is a small light source. A small light source makes drastic changes between the light and dark of the image. The sun is an example of a hard-light light source, even though it is not small, as it is extremely far away. In the middle of a sunny day with no clouds, the photo will have big dark, hard shadows.
- Soft light is when there is a slow transition between the shadows and the light. It is easier to work with for beginners in photography, as it doesn’t have as much impact on the photo if you change it a little bit. Soft light is created when the light source is either very close or huge compared to the subject. If the light source is close, it will surround the subject and create very few shadows. If the light source is big compared to the object it will do the same thing. In the middle of a sunny day with quite a lot of cloud coverage, the light will be soft. This is because the clouds diffuse the sun’s light rays, and that spreads out the light. Lot’s of beginner photographers will choose to practice when it is a day with a lot of clouds but not raining of course, as that might destroy the camera. Air pollution makes soft light, as that diffuses the light as well, so that’s why photos in Italy, etc. usually look better than if they were in New Zealand.
- What are the different types of lenses and what do I use each one for?
There are many, many, many different types of lenses for many different types of cameras. It depends what you want to photograph to know which type of lens you need to make the photo look best. You preferably want one which is affordable but gives you (with the correct settings) a superb image.
For distance photographs, you need to have a lens which can zoom in a long way. These types of lenses are called Zoom Lenses. This type of lens is great for outside photographers who take photos of wildlife in the open like lions and cheetahs, without being too close to them, along with many other things that it is tremendously useful for. There are also many types of zoom lenses. There is standard zoom, telephoto zoom, wide angle zoom, and super telephoto zoom.
- Canon EF 70-300mm IS Lens – Telephoto Zoom
- Canon EF-S 17-55mm f/2.8 IS USM – Standard Zoom
- Canon EF 70-200mm f/2.8L IS II USM – Telephoto Zoom
- Canon EF-S 10-22mm f/3.5-4.5 USM – Wide Angle Zoom
- Canon EF 100-400mm f/4.5-5.6 L IS USM – Super Telephoto Zoom
For portraits, you need a lens which suits what you want the photo to look like. If want blur behind the subject (bokeh) you will need a lens which has a wide aperture.
The place where you will be shooting also plays a big role to which lens would be best. The amount of space you will have will impact what focal length your lens will need to be, to make sure you get the right blend of subject and background. How many people will be in your shot also needs to be considered when buying a portrait lens, as the lens will have to be able to get everyone in, in the available space to shoot. Depending on how many lenses you want to carry around with you, some lenses are more versatile than others. Zoom lenses have many focal lengths, so they are quite versatile, whereas prime lenses only have one focal length, so they are less versatile. Prime lenses produce much better clarity and quality than zoom lenses.
- Canon EF 50mm f/1.4 USM
- Canon EF 50mm f/1.8 USM
- Canon EF 85mm f/1.2L II USM
- Canon 70-200mm f/2.8L IS II USM
- Canon EF 35mm f/1.4L II USM
- Canon EF 24-70mm f/2.8L II USM
- Canon EF 85mm f/1.8 USM
- Nikon AF-S NIKKOR 85mm f/1.4G
- Nikon 70-200mm f/2.8G AF-S ED VR II
- Nikon 50mm f/1.8G AF-S
For small object photographs, you need a lens which can get extremely close to the object without going blurry. These types of lenses are called Macro Lenses. They are able to focus really close to an object, so you can see all of the little details. They also allow small objects to fill up the entire photo, so there’s no distractions around the photo. Flowers are usually quite small, and people take photos of them with macro lenses so they can get up close, and still have a perfectly clear photo. Other examples are insects (bees, butterflies, etc.), plants, and small company products.
- Canon EF-S 60mm f/2.8 USM
- Canon EF 100mm f/2.8L Macro IS USM
- Canon EF 24-70mm f/4L IS USM
- Tokina 100mm f/2.8 AT-X Pro D Macro Canon EF
- Sigma 105mm f/2.8 EX DG OS HSM Macro Canon EF
- Canon MP-E 65mm f/2.8 Macro
- Sigma 70-300mm f/4-5.6 APO DG Macro Canon EF
- Canon EF 100mm f/2.8 Macro USM
- Tamron 70-300mm f/4-5.6 Di LD Macro Canon EF
- Canon EF 180mm f/3.5L Macro USM
- What are the types of photographers, and what equipment do you need for each?
Different types of photographers need different types of equipment. Which type of photographer you are depends on what you enjoy doing and looking at. If you love going to see wild life in Africa, or if you like to take the ‘purrfect’ photo of your pet cat, you’re going to need different types of photography gear.
- Fashion Photographer
This type of photography is where the photos are of clothing and/or other fashion items. These are usually when companies need to take photos of their clothing/fashion products. For this type of photography, you need access to a studio with adequate amounts of professional lighting, and a nice backdrop. This makes the best lighting and quality of the image possible. Fashion photographers also tend to get the subject at different angles to get the most eye-catching and interesting shots. This makes people look at it and are more likely to remember the photo. This is a great marketing tool to show the world what you’ve got. Always make sure you’ve got enough detail and clarity for the best result.
- Landscape Photographer
Landscape photography is when people take images of places from far away. This means it needs to be very clear and have lots of detail. There is a lot to take in, and that makes it very interesting. For this type of photography, you need to have planned a good location to shoot, and then get there in plenty of time and make sure you’ve got all of your equipment. Mother nature has a habit of throwing unexpected weather conditions, etc. at you, so you need to be ready for the unexpected events, because they will occur. Don’t get put off by a shower, wind, or fog. You will need a tripod to make sure your shots a still and not blurred. Also, don’t use any filters unless you have to, because most of the time they create problems that you won’t realise until you upload them for editing on your computer. If it’s bad weather at your location, don’t be afraid to still take some shots, as most often than not, they will appear unique. Shoot from different angles helps as well. It creates a sense of perception. Some from the ground, some from up above, etc. Sometimes less is more, so don’t feel you have to get the whole world into the frame. Get what’s necessary, and then go from there. Colour photographs don’t always have the same effect as black and white ones, so don’t be afraid to experiment with the settings. You could also try and use selective colouring, which only puts some parts of the photo in focus.
- Wildlife Photographer
For this type of photography, you need to not be afraid to go to weird and wonderful places to find the wildlife. You will need a lot of patience, because you will have to wait for the animals to get to the perfect position for the shot. Also, you can’t be seen by the wildlife, otherwise they will either get a fright and hide, or try and eat you. You probably don’t want either of those things to happen, so it’s best to try and camouflage yourself as best as possible. This makes it possible to capture the awesome picture. Another thing that will help is going to your place of photography often before you try and take photos to get to know the animals and their habits. That way, they will be more accepting when you stick a camera in their face. Although, the other way is to get a super zoom lens which can zoom all the way in to the animal(s), so that they don’t see you. With small insects you will have to get a macro lens and be super close. It is a good idea to get some of the background n with the animal, as you want to show the habitat of the animal. It connects more with the viewer. The animals have different personalities, so you should try and show that when taking the photo. This type of photography takes a lot of patience, but is super rewarding once you’ve got the photos and you know you took them. There are many prizes for the best wildlife photography images, so it’s a good type to get involved in if you like competitions!
- Action/Sports Photographer
For this type of photography, you need to know about the sport you are taking a photo of. If you don’t, you will not give yourself the best chance of taking a wonderful photo that will catch peoples eyes. You need to make it stand out from other photos, and you can do that in multiple ways. Also get to know the athlete that you’re taking the photo of. They will most likely want to get photos taken of them to spread the word about them, and that might make them and you a bit more famous. Professional athletes will always be better to take photos of, because they will know what to do to get the best shots. Shoot them doing what they feel comfortable doing, so that it looks natural and not faked. You can ask the athlete to do something to make the picture look even cooler if you have to though. Use different colours to make the person stand out from the background so that the viewer’s attention is drawn to the trick.
- Pet Photographer
Pets are super cute and getting photos of them comes naturally. To make this work though, you’re going to need a few things, as sometimes pets don’t like things shoved in their faces. For this type of photography, you are going to need a speed-light or a flash which will illuminate your pet, but only for the amount of time that is needed for the shutter speed to be opened. This way, it only blinds the pets for a very short amount of time. Never use the camera’s flash, because it creates the light right in front of the subject, and that looks ugly. Always have the focus of the image on the eyes of the pet. Don’t let the camera set it to what is closest to the camera, because that is usually the nose. The shot looks much better with the eyes in focus than the nose in focus. You don’t need to spend millions to get the best equipment, although it looks best if you do spend a little bit. It will help with the quality and clarity of the image. Details will show up better with a better lens. You will need a certain amount of luck, as pets don’t always want to cooperate, although using an app like Human-to-Cat Translator, or Dog Squeaky Toy to get their attention. Before you take the shot, make sure to have a clean background, which means tidying up before the shot is taken.
- Food Photographer
For this type of photography, you need to place your food on a pleasant background that will reflect the type of food that you’re taking a photo of. Use daylight if possible. The natural the better. That being said, it is really difficult to get the exposure right if you’re in direct sunlight, so it’s better to stay out of the way of being directly in it. Also, make sure you’re happy with the shadows in the frame. Don’t have unnecessary shadows, but sometimes they can look quite artistic if used to your advantage correctly. Contrasts between colours can make all the difference, so getting food with completely different colours is key to making the perfect food shot. Taking from above also usually helps. When looking at the food from a ‘bird’s eye view’, you tend to notice more detail in the food and the background is usually quite neat. Side angle shots are also great for food like ice-creams and smoothies, since they don’t go sideways on the ground. Try to get the food arranged neatly and/or symmetrical, because it helps to emphasize the food more. Tell a story with your photographs and maybe add some human life into it (e.g. hands, using cutlery, etc.) as that makes it look more natural.
- Street Photographer
Street photography is when someone takes a photo of anything on streets. It is usually quite artistic and creative and done without the subject’s knowledge, so it’s a more realistic shot. For this type of photography, you need to get creative and get your camera ready for when the perfect people come into the perfect place, you’re ready for it. This will happen when you’ve done many practice shots. The best people to shoot are people wearing interesting clothing or are generally interesting. Your average adult or teenager aren’t very good to shoot at because the photo will look generic and boring. The fear of getting caught is not that bad, as you can say that you weren’t taking a photo of them, but if it is obvious that you were taking a photo of them, then you should own up and maybe say something like “I really liked your hat, so I wanted a photo of it” or something similar. They may feel flattered. You can also offer to send the photo to them. If they ask you to delete it, just do it. There will be plenty more opportunities later. The right settings on the camera will help to get the subject in focus and looking interesting. You don’t want to find out when you get home that all of your photos are ruined because you had the wrong settings on. Experience and experimenting are key factors of getting the right shot. You just need to practice, and eventually you will get the hang of it and start getting those awesome shots you always wanted to get.
- Underwater Photographer
Taking pictures underwater is crazy when you think about it; you’re taking electrical equipment into the ocean to capture once-in-a lifetime memories. For this type of photography, you need to make sure that all the equipment you’re going to bring down into the depths have been put into waterproof containers, so they don’t get destroyed. When you’ve got your subject, get as close as you can to it (although make sure you never touch any of the coral as it takes decades to heal from one human touch) since the further away you are, the less clarity you’re going to get, and it will be less sharp and colourful. The colours are one of the things that make ocean photography superior to other types of photography. Always make sure that if the subject has eyes, that they are the most important feature to get in focus. If you’re going to go deep, you’re going to need a flash, but the built-in flash is always horrible, so it’s best to either use natural light when possible or get a flash that comes away from the camera.
- What’s the difference between SD cards and compact flash, and which cards are best for what situation?
The SD card was invented by Panasonic, Toshiba, and SanDisk in January 2000 when they formed the SD association. They use NAND flash technology. In 2009, the SDXC card was introduced, and that could store up to 2TB of data. In 2010, the UHS (Ultra High Speed) format was introduced, that could cope with filming in 4K, and taking many high-quality shots at one time in a burst. Some cameras and computers take MicroSD cards, which are a lot smaller than full size SD cards. To get the information onto a computer which doesn’t have a MicroSD card slot, then you can either buy a MicroSD card adapter, or buy a MicroSD card to USB reader. The adapter is really good for making the card a 2-in-1 kind of product.
Compact flash cards (CF Cards) are a little bit chunkier than secure digital cards (SD cards) and used before SD cards were first invented in digital cameras. The first SD cards were very slow, which made choosing between CF cards and SD cards easy. The CF cards were so much faster and that made it possible to take many photos at once. This was especially important for sports photographers, which need to take burst photos a lot so having a fast read/write speed is important. Because SD cards are a lot smaller, digital camera manufacturers could make much smaller cameras. CF cards are also a lot more expensive than SD cards. SD cards are a lot more durable, which makes it perfect for outdoor photographers who need to go places where you can get fantastic photos of vast landscapes, etc. so that if you drop it in water, or drop it on concrete, or someone accidently puts a magnet on it, it will survive (although it’s still best not to do that because the damage is all accumulative). A new CF card by Toshiba can write 6+ frames per second (fps) in RAW with 10-20 megapixels. RAW is important for editing afterwards if you want the most control and most settings available. Normally, CF cards have a lot bigger storage capacity than SD cards, meaning it can store a lot more photos/videos. There are, however, SDHC cards (Secure Digital High Capacity cards) and SDXC cards (Secure Digital ‘Xtra Capacity cards / Secure Digital Extended Capacity cards) which hold a lot of space. The only problem with having lots of space, is that if you lose the card, then you’ve also lost a lot of photos. It also takes of time to download the photos and videos because there are so many of them, so if you want to take many photos and choose the best ones quickly, big storage isn’t for you. Also, older cameras and computers may not be able to recognise the format of the higher capacity cards. If you do want to have super-fast read speeds for downloading the photos to your computer, then the type of SD card/CF card reader makes a huge difference. SD cards are actually a tiny little bit slower at writing speeds than CF cards, but the price difference for about a second more time to clear the buffer is not worth it for most people. If you want to use a CF card, then you will need to have lots of money to spare. SD cards are just so much cheaper and more durable. If you insert a CF card incorrectly, then damage can occur, so make sure you know which way to put the card in before you start to try. There are 50 pins on the CF cards which need to all make contact with 50 receptors in the camera card slot, and they are not protected, so they can easily bend and become unable to be read by the camera. This can be fixed with a screwdriver, but doing that is not recommended. They have the possibility to become ‘bricked’. There are 2 different types of CF cards: ‘Type I’ which is and ‘Type II’. The only difference is that Type I is 3.3mm thick and Type II is 5mm thick. Type I can fit into Type I and Type II slots. Type II can only fit into ‘Type II’ slots.
- What’s the rule of thirds and how can I use it to make my photos better?
The rule of thirds is when you position the camera/subject so that they look correctly balanced and interesting. When breaking the photo down for the rule of thirds, you need to put 2 vertical and 2 horizontal lines evenly spaced to make 9 spaces of the same length and height. You need to them line up the subject of the shot with one of the 4 lines, and it will make the photo more interesting and more natural to view for people (people tend to look at one of the intersecting points on a photo, rather than the centre – this makes it more natural to look at). Some cameras nowadays already have the grid built in to the viewfinder. Some have the option of turning them on or off, depending on what you want. The origin of the technique can be dated back to the 18th century.
If you’re taking a photo of a person, then try and get their head lined up by making their eye in one of the 4 intersecting points or their body along one of the vertical lines with the person’s eyes/head (depending on how far away you are) crossing one of the horizontal lines. If there are other objects in the scene, then try to make them the second point of interest by having them in the centre column of the grid. This brings the attention of the viewer to the person first, then to the surrounding objects. You may need to move around a little bit if you are going to try and get them in the correct section of the grid. Most of the time, you won’t be able to ask the person if they would like to move, unless you are just taking a photo of them and they have turned up for their photo to be taken. If that’s not the purpose of them coming, then you need to be the one that needs to move around to find the best angle and rule of thirds position. All of these things will help keep the photo having some breathing space and shows some of the background of where the person is, giving it more impact to the audience. It also stops it from resembling a mugshot, as they’re always in the centre of the photo. Leave more of the space pointing towards where the person is looking/going. This means that you can see what’s going to happen to them / what they’re about to do.
If taking photos of a landscape, then you should try to get the horizon along either the top or the bottom horizontal line, depending on where the subject of the photo is. If it’s in the middle, then it might create the feeling of it being in two halves, rather than flowing as one. Also try and get a subject in the photo and align it according to the rule of thirds as best as you can. Leaving space around the subject makes sure that the photo doesn’t look too overcrowded and busy. It evens things up a little bit. If you forgot to take the photo with the rule of thirds in mind, then you can always crop the image and post-image editing. You can do this in most photo editing programs. Some even have built in ‘rule of thirds’ cropping where it automatically detects the subject/horizon/trajectory of subject and lines it up well.
In some cases (like with most art), the rules are there to be broken sometimes, so you can break the rule of thirds. It can make much more eye-catching photos. Just be careful not to break the rule too often, especially if you’re just starting out. Also (like with most art), there is no perfect composition for a photograph, so you can be a little bit messy, and that could look even better. For example, you would ignore the vertical lines for a standard headshot, and just line the eyes up with the top or bottom line (usually the top one, but always consider both).
Just like with everything, the more practice you have, the better your photos are going to look, and how natural it will come to take photos without specifically thinking about the rule of thirds every single time. Experiment with different options in the rule of thirds and thoroughly investigate, what to do it of, who to do it with if it’s a person that you want/need to take a photo of, when to do it, where would be the best location for this / where are you now and what benefits and disadvantages might you have with this location / what is this location famous for, why you are taking a photo of what you are taking the photo of (job, enjoyment, competition), and last of all – how are you going to take the photo, and every point before this one will help to make that a lot simpler to decide.
- What is F-Stop, and how can I use it to make my photos better?
A ‘stop’ is the measurement units for exposure in photography. Doubling the stop would double the exposure. This means that if you had your aperture set to f/8, shutter speed 1/100, and ISO to 100, then increasing it by one stop would either be:
- Aperture: f/5.6 Shutter Speed: 1/100 ISO: 100
- Aperture: f/8 Shutter Speed: 1/50 ISO: 100
- Aperture: f/8 Shutter Speed 1/100 ISO: 200
This means that the exposure is twice as sensitive to light than before.
F-Stop is determined by getting the lens’ field of view (focal length of the lens) and then dividing by the diameter of the aperture. The field of view is how big the lens can go to capture something (the larger the height and width, the larger the field of view). It is how much of the area you are photographing in it can get in the photo. If a camera lens has a field of view of 300mm and the f-stop number was f/4, then the lens would have a width and height of 75mm.
The larger the f-stop number, the smaller the diameter of the lens. For example, if the f-stop number was increased to f/5 would get a diameter of 60mm. The ‘f’ in f-stop or f/2 stands for focal length. When there is a decimal point in the f-stop value, then it is either a half-stop or a third-stop. Also, if you decrease the f-stop value by 2, then the lens will let in a quarter of the amount of light because of the 2 stop decrease. The half stop scale of a lens with an aperture value of f/4 – f/5.6 is f/4, f/4.8, f/5.6.
The normal f-stop scale is:
- f/1.4 (very large opening of your aperture blades, lets in a lot of light)
- f/2.0 (lets in half as much light as f/1.4)
- f/2.8 (lets in half as much light as f/2.0)
- f/4.0 (etc.)
- f/5.6
- f/8.0
- f/11.0
- f/16.0
- f/22.0
- f/32.0 (very small aperture, lets in almost no light).
Each letting in half as much light as the previous f-stop value.
The third stop scale would be f/4, f/4.5, f/4.8, f/5, f/5.6. Each letting in a third much light as the previous f-stop value.
Bringing the f-stop down (letting in more light) will make a shallow depth of field, which means that it will blur more of the background. If you have a large depth of field (high f-stop value – less light) will bring the background better into focus. The f-stop is written as a fraction (f/8 =
f8). You can think of the fraction
18as a one-eighth aperture.
12is larger than
18.
- What is ISO, Shutter Speed, and Aperture and how do they link together to make my photos better?
ISO is how sensitive the image sensor in the camera is. It is measured in numbers – the higher the number the more sensitive it is to light, which means that it will be grainier (noisier). The lower the ISO number, the less sensitive the image sensor is to light, which means that it is less grainy. Increasing the ISO means that you can take photos at night, but at the cost of a grainy photo. You could also decrease the shutter speed if taking a photo of a moving subject so that it was frozen when the photo was taken, and then increase the ISO to compensate. ISO 100 is usually the ‘standard’ setting for cameras to get the best crispiness in a shot. Sometimes cameras will unlock/lock certain aperture and shutter speed settings when changing the ISO setting. The ISO range found in most cameras is:
- ISO 100 (low ISO)
- ISO 200
- ISO 400
- ISO 800
- ISO 1600
- ISO 3200
- ISO 6400 (high ISO)
When doubling the ISO, you are going one step up, making the image twice as bright. The base ISO is the lowest ISO setting, which gives you the sharpest quality image the camera can do. Most cameras will have a base ISO of 100. Some older DSLR cameras will have a base ISO of 200. The best idea is to stick to that base ISO to get the best quality, but that’s not always possible, and it is very good to be able to be not afraid to change it. You should only increase the ISO when there isn’t enough light to take a photo when it’s on a low setting. This could be because
Shutter Speed is
Aperture is
Bibliography
- Lundquist, S. (2017, October 13). JPGs, PNGs and GIFs, oh my! Everything you need to know about image file formats. Retrieved March 18, 2018, from http://www.99designs.com/blog/tips/image-file-types/
- V. (2015, August 14). Difference between JPG and JPEG. Retrieved March 18, 2018, from http://www.differencebetween.info/difference-between-jpg-and-jpeg
- A few scanning tips. (n.d.). Retrieved March 18, 2018, from http://www.scantips.com/basics09.html
- Research Guides: All About Images: Image File Formats. (n.d.). Retrieved March 18, 2018, from http://guides.lib.umich.edu/c.php?g=282942&p=1885348
- Malbon, C. (2016, October 25). The Advantages and the Disadvantages of Vector Images. Retrieved March 18, 2018, from http://chrismalbon.co.uk/the-advantages-and-the-disadvantages-of-vector-images/
- Bentum, K. (2017, March 14). 9 Perspective Tips for Creating High Impact iPhone Photos. Retrieved March 18, 2018, from https://iphonephotographyschool.com/perspective/
- Archambault, M. (2015, September 22). 8 Camera Shots and Angles From Cinema That Can Help Improve Your Photos. Retrieved March 18, 2018, from https://petapixel.com/2015/09/22/8-camera-angles-from-the-world-of-cinema-that-can-help-improve-your-photos/
- Bonusprint. (2018). How to use different angles to take better photos. Retrieved March 18, 2018, from https://www.bonusprint.co.uk/tips/how-to-use-different-angles-to-take-better-photos
- Rowse, D. (2011, October 05). Introduction to White Balance. Retrieved March 20, 2018, from https://digital-photography-school.com/introduction-to-white-balance/
- Cambridge in Colour. (2005, May 20). TUTORIALS: WHITE BALANCE. Retrieved March 22, 2018, from https://www.cambridgeincolour.com/tutorials/white-balance.htm
- Verosky, E. (2012, August 13). Retrieved March 22, 2018, from https://www.youtube.com/watch?v=EJWNQv01VtI
- Richards, D. (2013, January 29). The Top 10 Photography Lighting Facts You Should Know. Retrieved March 22, 2018, from https://www.popphoto.com/gallery/top-10-photography-lighting-facts-you-should-know#page-2
- The Ultimate Guide to Learning Photography: Lighting for Beginners. (n.d.). Retrieved March 25, 2018, from https://www.creativelive.com/photography-guides/lighting-for-beginners
- Pathak, V. (2016, January 24). What is the best lens for a Canon EOS 700D, which improves quality and is around $600? Retrieved April 28, 2018, from https://www.quora.com/What-is-the-best-lens-for-a-Canon-EOS-700D-which-improves-quality-and-is-around-600
- Admin. (2013, April 25). Canon 700D Recommended Lenses. Retrieved April 28, 2018, from http://thenewcamera.com/canon-700d-recommended-lenses/
- DIGITALREV. (2011, November 18). 5 Lenses You Must Have for Canon EOS 7D. Retrieved April 28, 2018, from https://www.digitalrev.com/article/5-lenses-you-must-have
- IR Staff. (2015, November 4). 8 best lenses for your new Canon DSLR. Retrieved April 28, 2018, from https://www.imaging-resource.com/news/2015/11/04/8-best-lenses-for-your-new-canon-dslr
- Freriks, I. (2014, August 27). Vanda Storie. Retrieved April 28, 2018, from https://www.camerastuffreview.com/en/general/best-lens-for-canon-700d
- Freriks, I. (2013, September 27). REVIEW CANON 700D. Retrieved April 28, 2018, from https://www.camerastuffreview.com/en/canon-camera-review/canon-700d-review
- Carter, K. (2017, September 17). Best lenses for your Canon EOS 700D: More than 120 lenses tested! Retrieved April 28, 2018, from https://www.dxomark.com/best-lenses-for-your-canon-eos-700d-more-than-120-lenses-tested/
- BorrowLenses. (2016, August 10). The 10 Best Canon and Nikon Lenses for Portrait Photography. Retrieved April 28, 2018, from https://www.borrowlenses.com/blog/best-portrait-lens/
- Lens Hero. (2013, September 6). Canon EOS 700D Macro Lenses. Retrieved April 28, 2018, from http://lenshero.com/lenses/Canon-700D-macro-lens
- PhotographyMad. (2011, April 4). Macro Lenses. Retrieved April 28, 2018, from https://www.photographymad.com/pages/view/macro-lenses
- Bailey, G. (2012, December 27). 30 Types of Photographers Exposed – Which One Are You? Retrieved May 10, 2018, from http://photodoto.com/types-of-photographers/
- Hull, C. (2018, May 02). The Complete Guide To Fashion Photography: 92 Tips. Retrieved May 13, 2018, from https://expertphotography.com/the-complete-guide-to-fashion-photography-tips/
- Rutter, C. (2018, March 27). The 10 laws of landscape photography. Retrieved May 13, 2018, from https://www.techradar.com/how-to/photography-video-capture/cameras/the-10-commandments-of-landscape-photography-and-how-to-break-them-1320832
- Photographing Wildlife — Photo Tips. (2012, October 07). Retrieved May 13, 2018, from https://www.nationalgeographic.com/photography/photo-tips/pbb-wildlife/
- Ingersoll, T., & T. (2013, May 28). How To Approach Action Sports Photography. Retrieved May 13, 2018, from https://fstoppers.com/sports/how-approach-action-sports-photography-3166
- Shu, L. (2013, June 02). How to take the best head shots of Fido for his Animal Planet audition. Retrieved May 13, 2018, from https://www.digitaltrends.com/photography/how-to-take-best-pet-photography/
- Pflughoeft, J. (2017, August 30). Top 10 Pet Photography Tips and Techniques. Retrieved May 13, 2018, from https://digital-photography-school.com/top-10-pet-photography-tips-techniques/
- Rudolfa, L. (2017, March 10). 13 Tips For Beautiful & Tempting iPhone Food Photography. Retrieved May 13, 2018, from https://iphonephotographyschool.com/food/
- Kirtz, J. (2017, February 07). Street Photography for Beginners. Retrieved May 13, 2018, from https://www.youtube.com/watch?v=NnfNqKlRZkg
- Hopper, D. (2015, December 22). 10 Tips for Successful Street Photography. Retrieved May 13, 2018, from https://petapixel.com/2015/12/22/10-tips-for-successful-street-photography/
- Gietler, S. (2009, May 30). Underwater Photography Tips. Retrieved May 13, 2018, from http://www.uwphotographyguide.com/underwater-photography-tips
- Barbiaux, J. (2016, February 14). SD Cards VS. Compact Flash. Retrieved May 17, 2018, from https://www.photolisticlife.com/2013/07/16/sd-cards-vs-compact-flash/
- What Digital Camera. (2016, January 18). Understanding Memory Cards. Retrieved May 19, 2018, from http://www.whatdigitalcamera.com/buying-advice/understanding-memory-cards-9083
- Techopedia. (2012, December 13). What is CompactFlash (CF)? – Definition from Techopedia. Retrieved May 19, 2018, from https://www.techopedia.com/definition/25275/compactflash-cf
- Ward, C. (2015, January 07). Everything You Need to Know: CF Cards. Retrieved May 19, 2018, from https://www.premiumbeat.com/blog/everything-you-need-to-know-about-cf-cards/
- What is the difference between Type I and Type II CompactFlash (CF) memory cards? (n.d.). Retrieved May 19, 2018, from https://us.transcend-info.com/Support/FAQ-312
- PCMag. (2015, May 30). Definition of SD Card. Retrieved May 20, 2018, from https://www.pcmag.com/encyclopedia/term/50962/sd-card
- Rowse, D. (2018, May 25). Rule of Thirds in Photography. Retrieved June 6, 2018, from https://digital-photography-school.com/rule-of-thirds/
- PhotographyMad. (2011, October 24). Rule of Thirds. Retrieved June 7, 2018, from https://www.photographymad.com/pages/view/rule-of-thirds
- Thurston, A. (2017, July 06). The Rule of Thirds: What is it and why does it matter? Retrieved June 07, 2018, from https://www.digitaltrends.com/photography/what-is-rule-of-thirds/
- Harris, J. (2018, March 20). Who Wrote the Rule of Thirds? Retrieved June 10, 2018, from https://www.bhphotovideo.com/explora/photography/tips-and-solutions/who-wrote-rule-thirds?
- Chandler, N. (2010, December 07). How to Know What F-Stop to Use. Retrieved June 11, 2018, from https://electronics.howstuffworks.com/cameras-photography/tips/how-to-know-what-f-stop-to-use.htm
- Carl, R. (2010, June 25). What is an F-Stop? Retrieved June 11, 2018, from https://www.picturecorrect.com/tips/what-is-an-f-stop/
- Cox, S. (2018, April 03). Aperture and F-Stop Explained for Beginners. Retrieved June 13, 2018, from https://photographylife.com/landscapes/aperture-and-f-stop-explained-for-beginners
- J. (2018, March 08). Understanding F/Stops & Stops In Photography Exposure. Retrieved June 13, 2018, from https://expertphotography.com/understanding-fstops-stops-in-photography-exposure/
- Rowse, D. (2018, May 27). ISO Settings in Digital Photography. Retrieved June 15, 2018, from https://digital-photography-school.com/iso-settings/
Cite This Work
To export a reference to this article please select a referencing stye below:
Related Services
View all


DMCA / Removal Request
If you are the original writer of this assignment and no longer wish to have your work published on UKEssays.com then please click the following link to email our support team:
Request essay removal